The Gold Rooms put two worlds in one room. A glowing seam splits the screen, each half keeps its own rules, and the two heroes have to work together across it. The game has six Gold Rooms, and this page covers all of them: HxM (Heroes and Mirrors), MxS (Mirrors and Stones), HxB (Heroes and Beamcasters), SxB (Skipping Stones and Beamcasters), HxS (Heroes and Skipping Stones) and MxB (Mirrors and Beamcasters).
HxM, MxS and MxB use the Mirror Isles rule: a mirror sends out two beams at a right angle. Anything standing on one beam can swap with the tile at the same distance on the other beam. A red beam means the landing tile is blocked. In a Gold Room the beam can cross the seam, so the Trader’s mirror can move things in the other world.
HxM: Heroes and Mirrors
Key idea: the Trader parks the mirror so its beam reaches into the heroes’ courtyard. Izzy feeds the monsters into that beam one by one, the mirror carries them out, and the courtyard gate opens. (0:00)
Steps follow Postmode’s video. The 100% Guides video shows the same route (the room starts at 0:35, after a walk from the hub), so use it as a second angle if a step is hard to see.
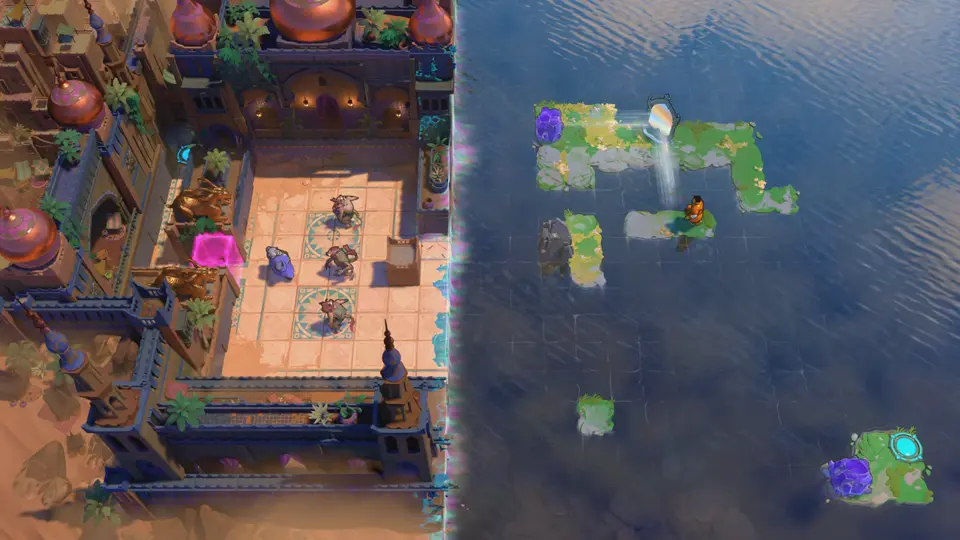
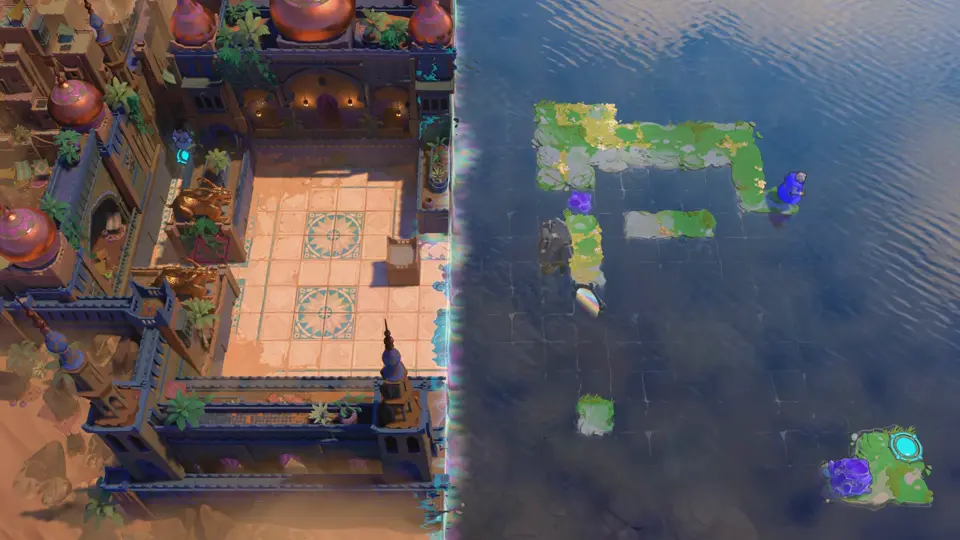
The layout. On the left is a Hauling Heroes courtyard: Izzy (purple), three monsters in a column, a crate by the east wall and a pink crystal gate on the west side. On the right is Mirror Isles water: the Trader, a mirror on the top island, a purple crystal in the top-left corner, a small yellow islet with a boulder, a tiny islet near the bottom and the exit on the bottom-right island, next to a second purple crystal.
- Stand the Trader on the mirror’s south beam on the small middle islet and swap. The Trader lands in the top-left corner and the crystal drops to the middle islet. (0:05)
- Use the mirror again to bring the crystal back to the top-left corner, then push it south off the top island. It drops into the gap above the yellow islet and fills it. (0:12)
- Push the mirror west along the top island to the corner, then south over the filled gap onto the yellow islet. Its west beam now runs into the courtyard beside the crate, and its south beam ends on the tiny islet below. (0:20)
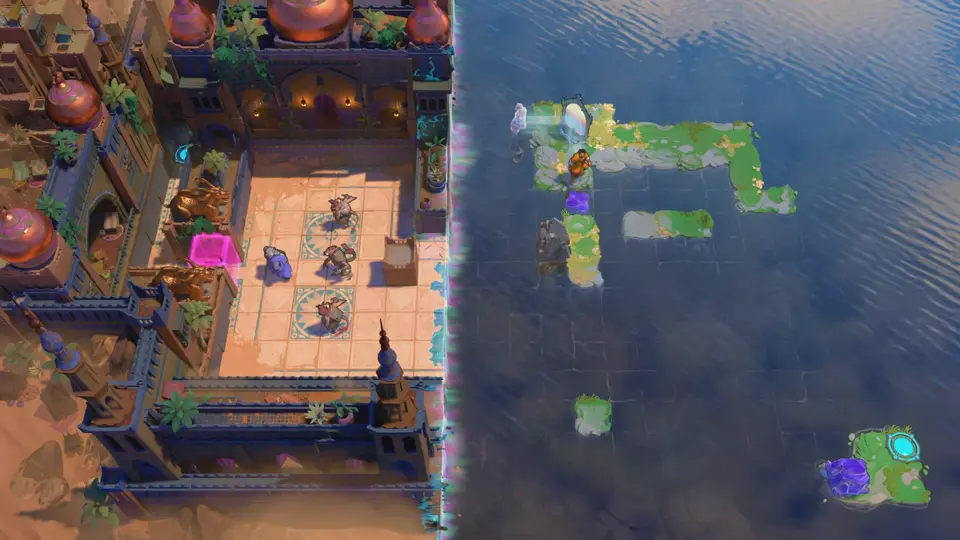
- Switch to Izzy. Walk to the bottom row and use her swap to pull the monsters out of their column and down to the south side of the courtyard. (0:34)
- Get a monster onto the beam tile next to the crate. Izzy does this by standing there herself and then swapping with the monster. Use the mirror and the monster is sent across the seam to the tiny islet. (0:46)
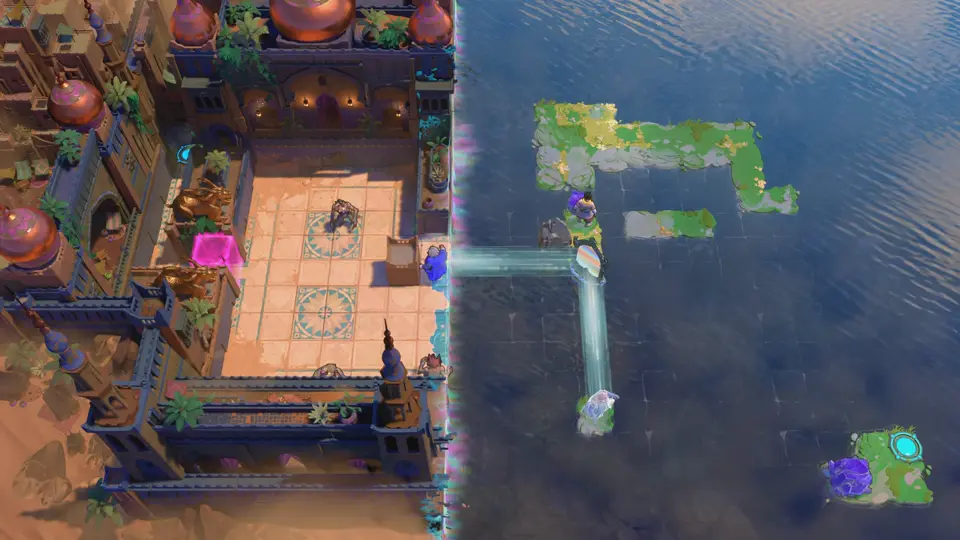
- Repeat with the other monsters. When the last one is gone, the pink gate turns into an outline. (1:16)
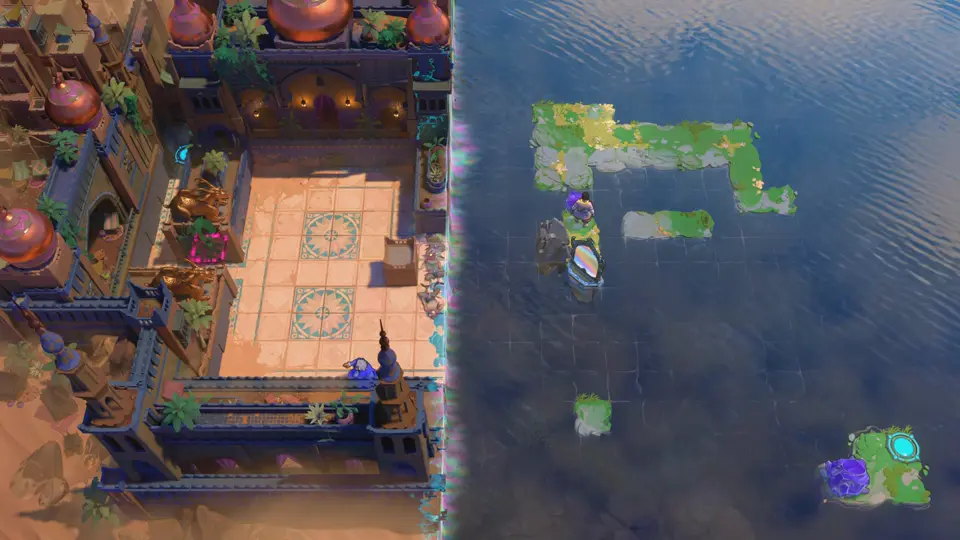
- With the Trader, push the mirror one tile south, off the islet, and stand where it was. The Trader is now level with the crate row. (1:25)
- Put Izzy on the east edge of the courtyard in the same row and swap with the Trader. Izzy lands on the islet; the Trader lands in the courtyard. (1:30)
- Walk the Trader west through the open gate. (1:32)
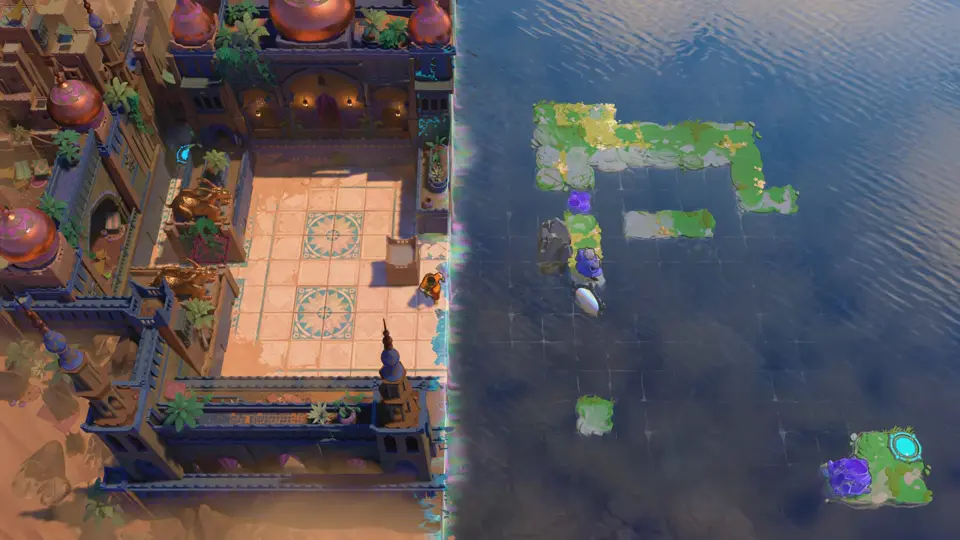
- Walk Izzy up and along the top island to its east end, which is in line with the crystal by the exit. Swap with that crystal and step onto the exit. (1:36)
MxS: Mirrors and Stones
Key idea: the mirror moves the Sailor and the pink stones between the two halves. The Sailor’s exit is hidden under a stone, so that stone has to be cleared off before either hero can finish. (0:00)
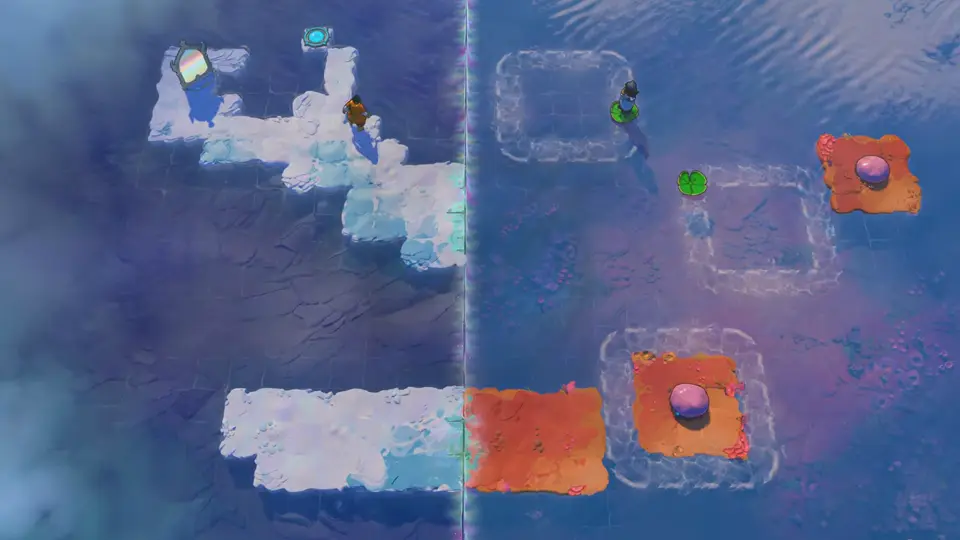
The layout. On the left, a pale ice path zigzags down from the Trader’s exit at the top. The mirror starts in the top-left corner. A separate pale strip at the bottom joins an orange island across the seam. On the right is the Sailor’s water: three square current loops that carry lily pads around, the Sailor on a lily pad in the top loop, and two orange islands, each with a pink stone. The bottom-right one sits inside a loop.
- With the Trader, push the mirror east and south down the ice until its east beam crosses the seam into the water. (0:05)
- Wait for the Sailor’s lily pad to drift into the beam, then use the mirror. The Sailor lands on the pale strip at the bottom. (0:15)
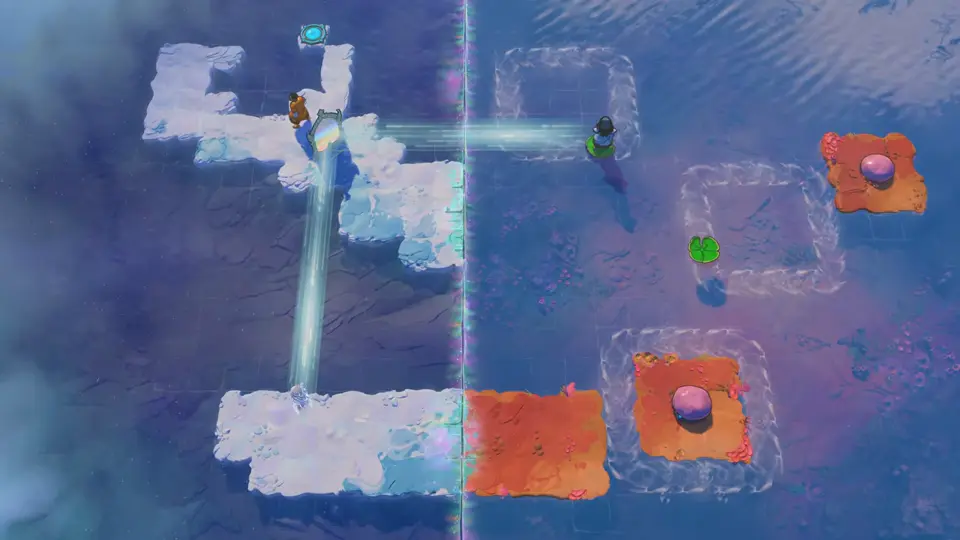
- Line the mirror up with the top-right orange island and send the Sailor there. If the beam is red, the landing tile is blocked; adjust and try again. (0:27)
- From the island, the Sailor skips its pink stone west. It bounces across the water and stops on the ice beside the mirror. (0:38)
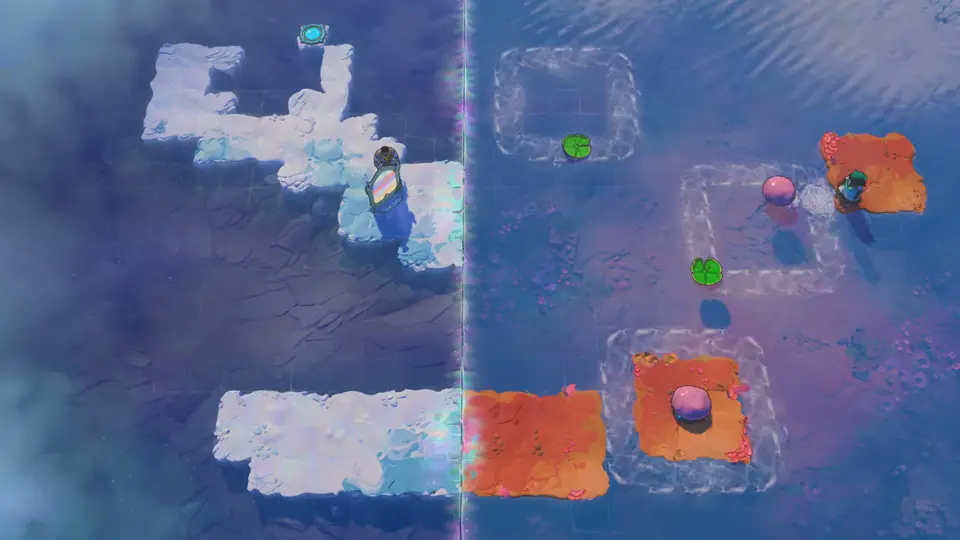
- The Trader pushes that stone south. It skips down to the pale strip at the bottom. (0:41)
- Use the mirror to bring the Sailor back down to the pale strip. (0:51)
- The Sailor skips the stone north. It lands on the ice under the mirror. (0:57)
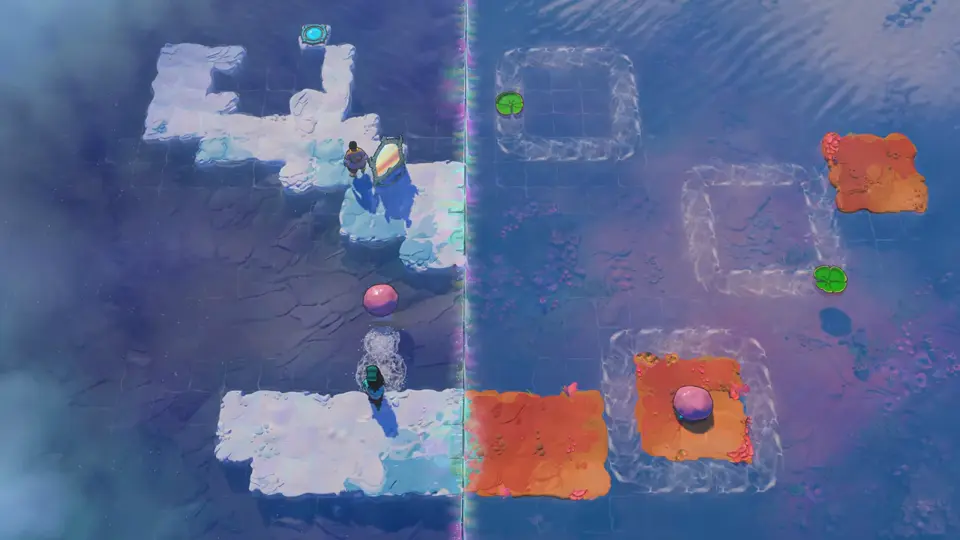
- The Trader works this stone up the ice and pushes it east into the water, out of the way. (1:00, push at 1:23)
- Take the Sailor east along the bottom to the island inside the bottom loop. Push its stone west off the middle of the island. The Sailor’s exit was underneath. (1:26)
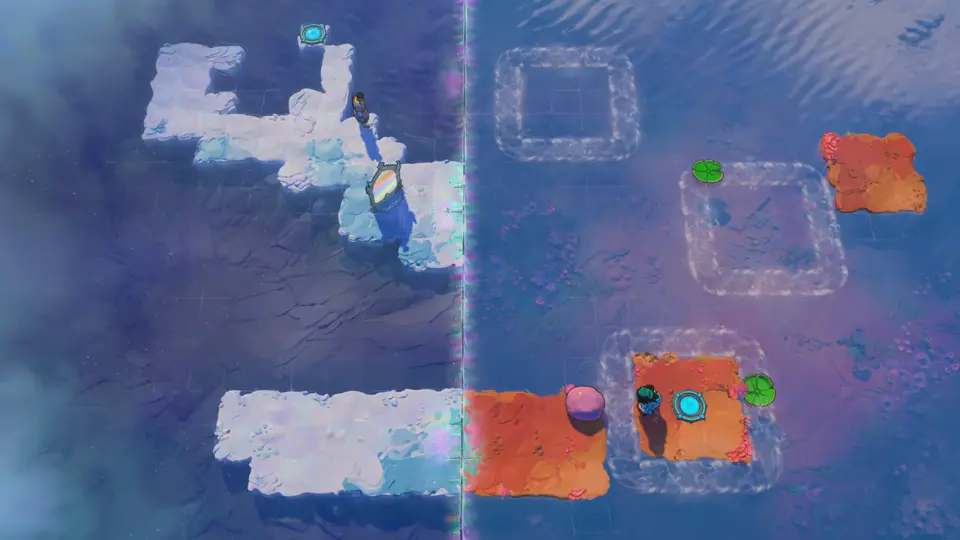
- Keep pushing that stone west, across the orange island onto the pale strip, then skip it north to the ice by the mirror. (1:32)
- The Trader pushes the mirror up the ice to the exit at the top and off to its side. Then he brings the stone up the same way and pushes it into the water beside the exit. Step onto the exit. (1:57)
- Walk the Sailor back east to the exit on the bottom-right island. (2:16)
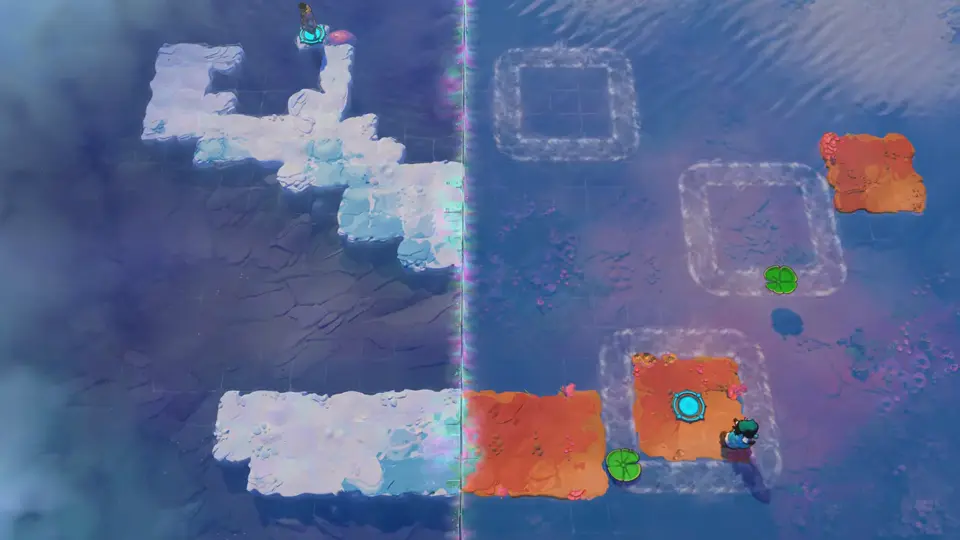
The video doesn’t show why the mirror and stone end up beside the Trader’s exit in step 11. Follow the clip if your board looks different there.
HxB: Heroes and Beamcasters
Key idea: the Explorer’s cyan beam reaches across the seam, so the Cleric can stand in it and push goblins. One goblin is wedged in a corner and can’t be pushed out the normal way. The room gives you two gems but the socket needs only one, so the spare gem goes across the seam and shoves that goblin loose, with the Cleric in between as a buffer. (0:00)
Steps follow Postmode’s video. 塞德莎’s Chinese video walks through the same route with commentary, and the explanation of the spare gem comes from there.
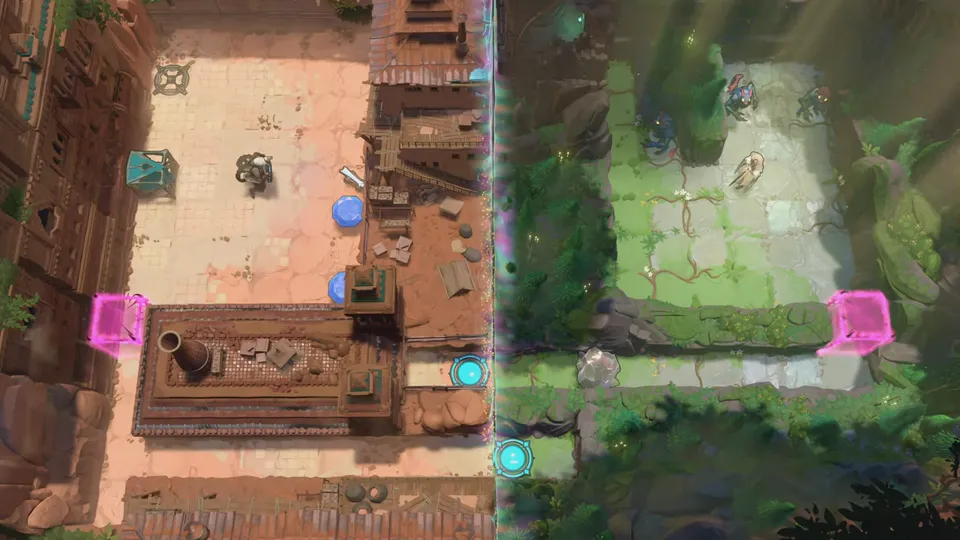
The layout. On the left is the Explorer’s sandy courtyard: an empty socket in the top-left corner, a teal emitter on the west wall below it, and two gems on the floor, one of them tucked into the corner of a long building that runs across the middle. A pink gate sits on the west wall beside that building, and a cyan exit pad sits at its east end, next to the seam. On the right is a forest clearing: the Cleric (white robes and a staff), one goblin by itself beside a tree on the left side, and two more near the top. Below the clearing, a lane with a pale rock in it ends at a second pink gate, and a second cyan pad sits just right of the seam at the bottom.
- With the Explorer, pick up the gem tucked into the building’s corner and put it in the empty socket. The emitter lights up and its cyan beam runs east, across the seam and through the clearing. (0:07)
- The clip moves the other gem at 0:14 and then rewinds it; skip that part. Stand south of the emitter and use the wand to move it one tile north. The Cleric walks into the beam and pushes the two goblins at the top one tile further north. 塞德莎 says this has to happen before the spare gem goes across. (0:23)
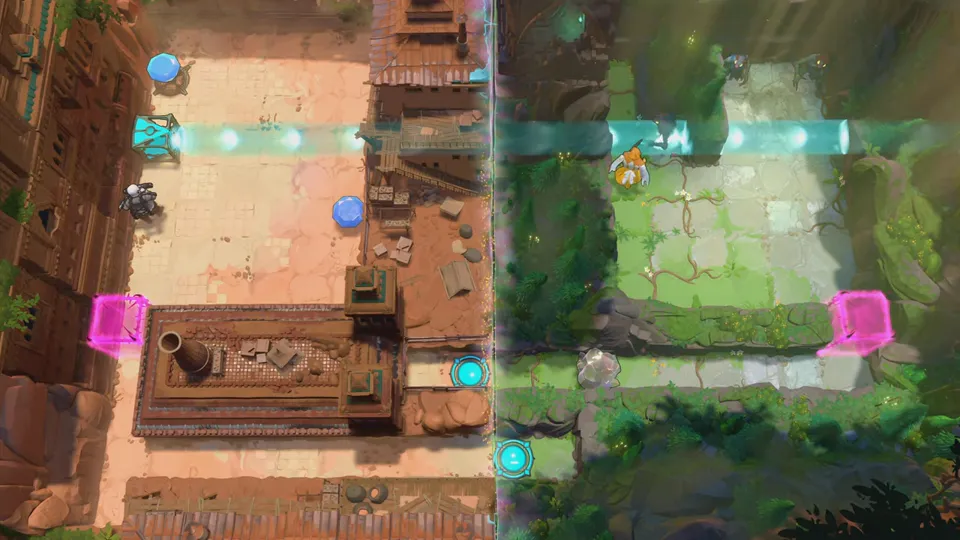
- Move the emitter back down a row while the Cleric gets into place right beside the lone goblin, then raise the emitter again so the beam runs along that row. (0:29)
- Stand south of the spare gem and use the wand to move it one tile north, into the beam. The beam now stops at the gem. (0:35)
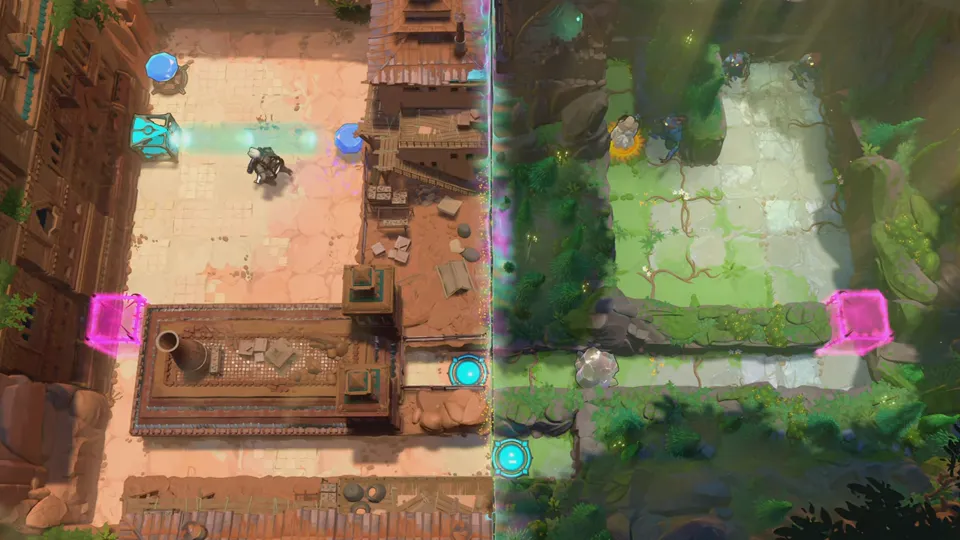
- Step into the beam west of the gem and drive it east into the seam. In a purple flash the gem comes out on the right on the Cleric’s tile, the Cleric is bumped aside, and the goblin is shoved one tile east, out of its corner. (0:37)
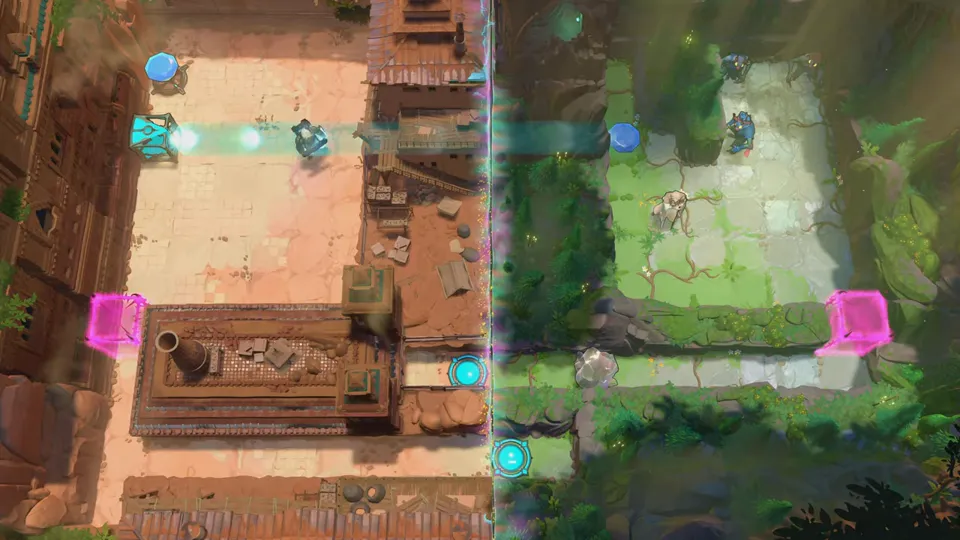
- With the Cleric, push the gem north, out of the beam’s row. (0:52)
- Now herd the loose goblin to the other two. The Explorer keeps moving the emitter up or down one row with the wand so the beam lines up with the Cleric, and the Cleric pushes the goblin a tile at a time. 塞德莎’s order is down first, then east, then one push north. That last push sends it into the two goblins at the top, all three disappear, and both pink gates turn into outlines. (0:56, gates open at 1:20)
- Take the Explorer to the open gate on the west wall and use the wand to move the emitter down through it, into the row with the cyan pad by the seam. The beam now runs east along that row and into the lane on the right. (1:24)
- Walk the Cleric through the open gate on the right and west along the lane. Standing in the beam, it pushes the pale rock across the seam, then steps onto the cyan pad on the left side. (1:27)
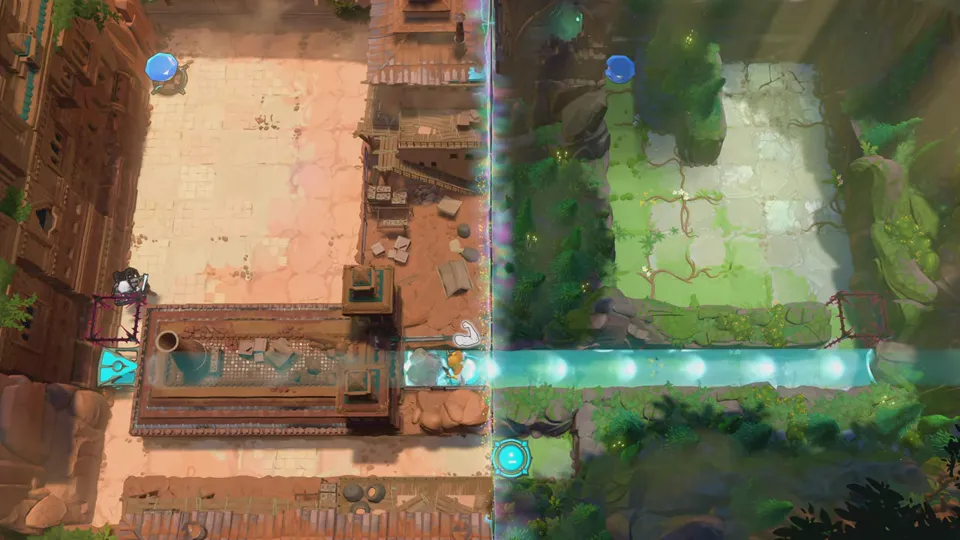
- Use the wand on the emitter again to push it further down and out of the Explorer’s way. Then walk the Explorer down and east along the sand lane, across the seam, onto the cyan pad on the Heroes’ side. (1:32)
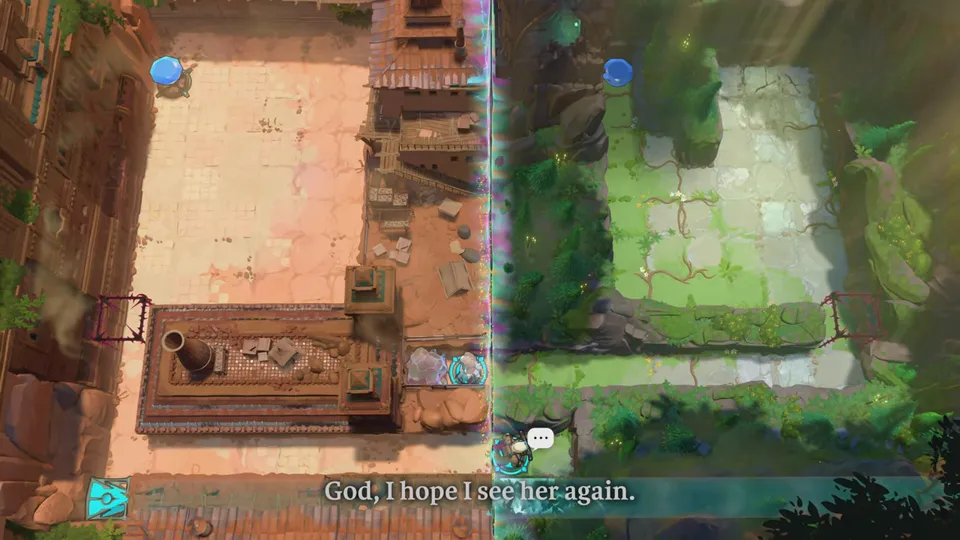
The video doesn’t show the goblin herding in step 7 one push at a time clearly, and it doesn’t explain why three goblins together disappear. If your goblin ends up somewhere else, follow the clip from 0:56.
SxB: Skipping Stones and Beamcasters
Key idea: the two heroes swap exits. The Sailor’s stones become a walkway for the Explorer, and the Explorer’s green beam lets the Sailor walk through walls. In the end the Explorer leaves by the Sailor’s dock and the Sailor by the exit inside the Explorer’s walled yard. (0:10)
Steps follow Postmode’s video. 塞德莎’s video solves the same room (in Chinese, from 1:39), so use it as a second angle if a step is hard to see.
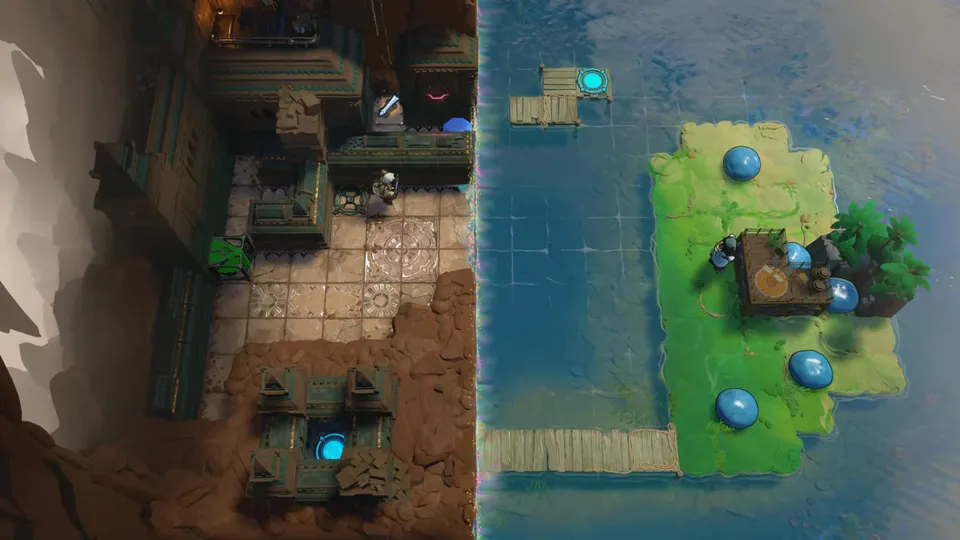
The layout. On the left is a Vault of the Beamcasters courtyard: the Explorer, a green emitter on the west wall (dark for now), an empty gem socket, and a cyan exit at the bottom, boxed in by walls. A gem sits on a ledge by the pink door at the top right, cut off from the courtyard by a wall, with a small item lying further along the same ledge. On the right is the Sailor’s water: a grass island with three loose blue stones, a wooden hut with two more stones shut inside it, a pier at the bottom and a small dock with the Sailor’s exit near the top, next to the seam.
- With the Sailor, kick the three loose stones west off the island, one at a time and each one row higher than the last. Each stone skips across the water, stops against the courtyard side of the seam and sinks. Together they make a column of stepping tiles along the seam, up to the ledge with the gem. (0:15)
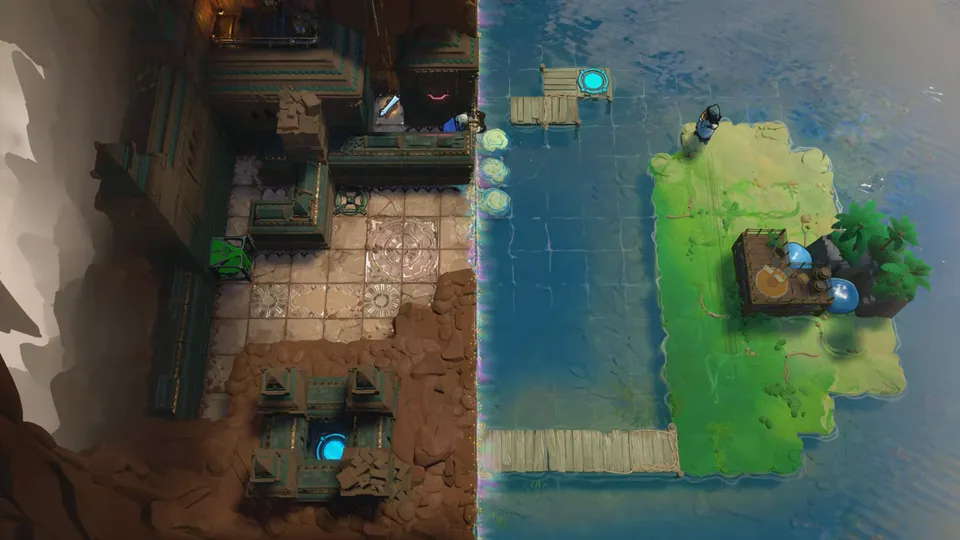
- Switch to the Explorer. Step east onto the stones, walk north and go onto the ledge. Pick up the gem, and the item further along the ledge too. (0:32)
- Come back the same way and put the gem in the courtyard socket. The green emitter lights up, and its beam runs east across the seam to the Sailor’s hut. (0:38)
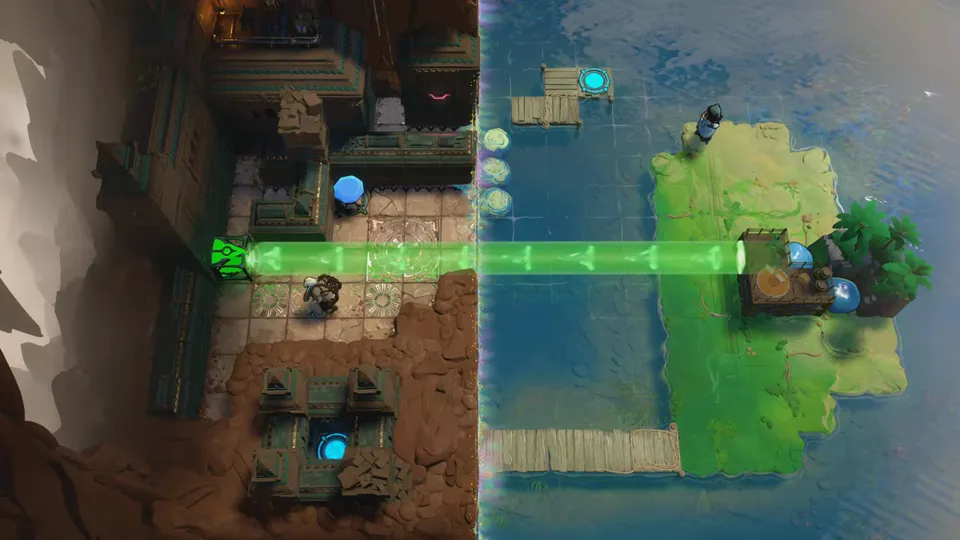
- Green lets you walk through walls, and it works on the Sailor too. The Explorer uses the item from the ledge on the emitter to move it a row up or down, which moves the beam with it. Line the beam up with the hut. Standing in the beam, the Sailor walks through the hut walls and pushes both stones out onto the island: one to the north, one to the south. Postmode moves the emitter several times here, so follow the clip if your beam ends up in a different row. (0:42, first stone out at 0:59, second at 1:08)
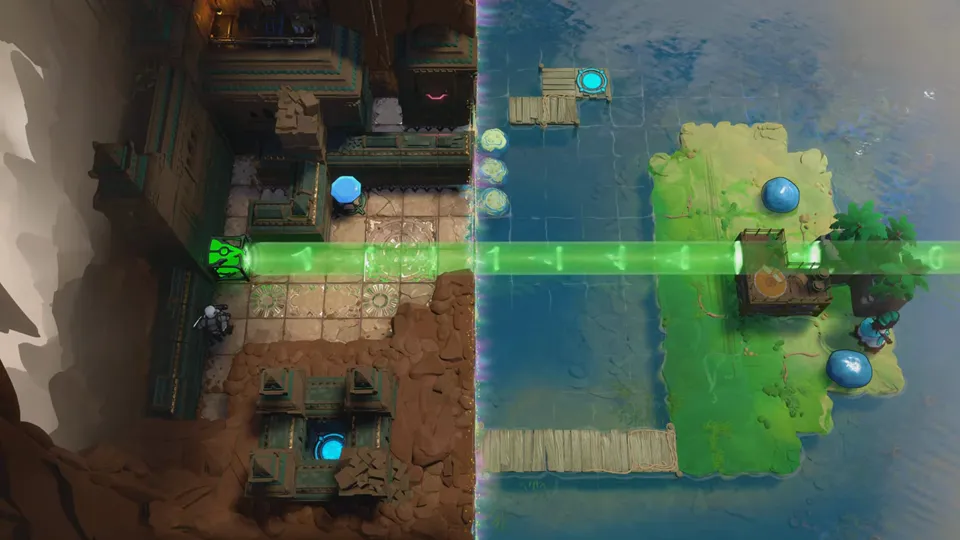
- Push the north stone to the top-left corner of the island. Put the Explorer on the top stepping stone, then have the Sailor kick that stone west along the top row. It stops beside the Explorer and becomes the last tile up to the Sailor’s dock. Postmode first kicks it without the Explorer standing there, then undoes that. (1:15, kick at 1:20)
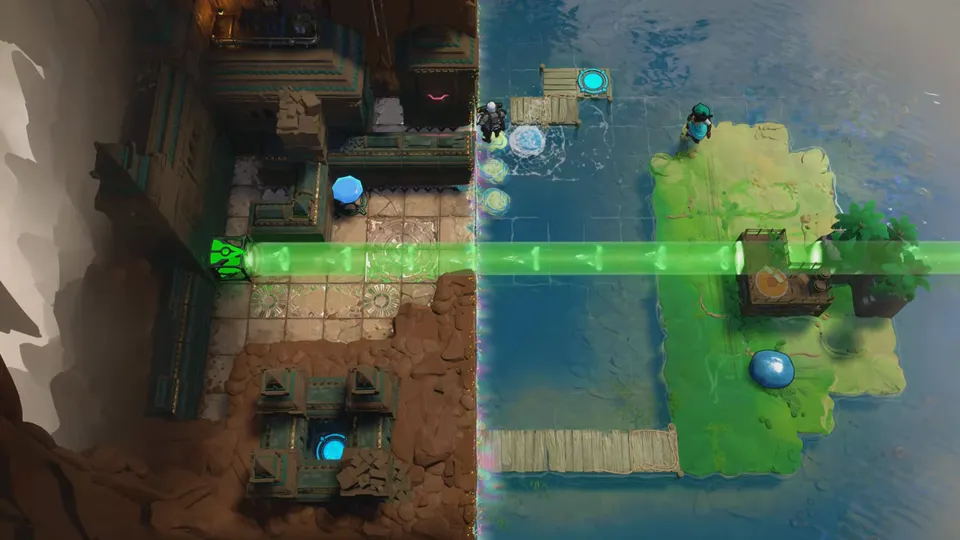
- Take the Sailor to the south stone and kick it west along the row just above the pier. It sinks against the seam. Walk the Sailor onto it. (1:28)
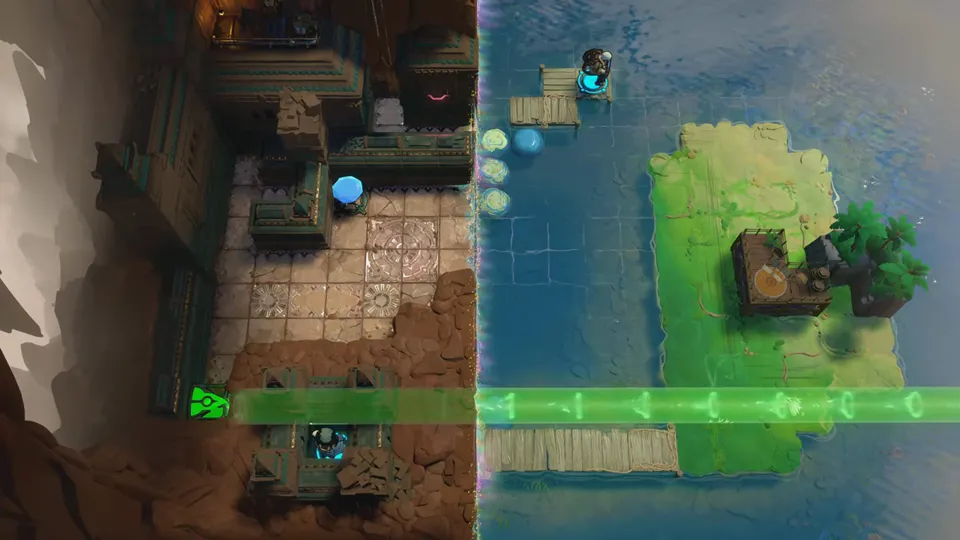
- With the Explorer, move the emitter down the wall to the bottom row. The beam now runs along the Sailor’s row and across the top of the walled exit. (1:39)
- Walk the Sailor west along the beam, through the wall and onto the exit in the Explorer’s half. Then walk the Explorer up the stepping stones and onto the Sailor’s dock exit. (1:45)
The video doesn’t name the item from the ledge or explain it. It looks like the wand from Vault of the Beamcasters, which moves what you face one tile forward, but we couldn’t confirm that from the clip.
HxS: Heroes and Skipping Stones
Key idea: the heroes clear their courtyard by getting the goblin and the dragon to take each other out, which opens the gate onto the water. Their two orange crystals go out into the Sailor’s water as a landing. The Sailor paves a path with sunk stones and, when two-stone paving runs out, uses a body as the stopper. The exits are swapped: the heroes finish on the yellow pads on the water side, the Sailor on the pad on the heroes’ side. (0:00)
Steps follow Postmode’s video. 塞德莎’s narrated run (in Chinese, where the room is labelled 黄金谜题[北6]) uses the same plan in a slightly different order: the heroes push their crystals into the water last.
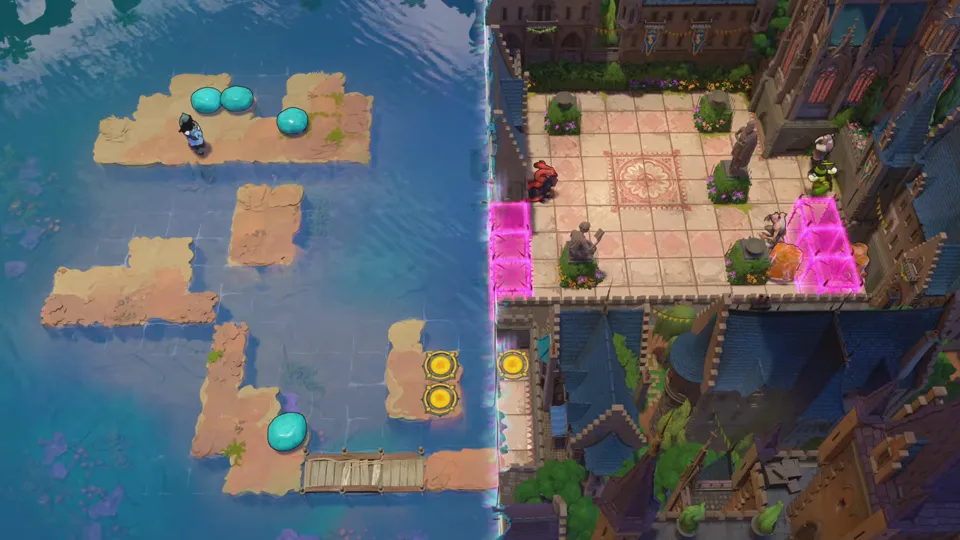
The layout. On the left is the Sailor’s water. The Sailor starts on the top island with three cyan stones. Below it are a small islet, an L-shaped island and a lower island with a fourth stone; a wooden bridge runs east from the lower island to a strip of land at the seam. A small islet just west of the seam holds two yellow pads. On the right is a Hauling Heroes courtyard: a red dragon on the west side next to a pink crystal gate, a goblin and an orange crystal in the bottom-right corner beside a pink cage (a second orange crystal is shut inside it), and the Warrior and the Thief (green) on the east side. A third yellow pad sits on the heroes’ side of the seam, below the courtyard.
- Watch the dragon’s row: it breathes fire east along it. The video burns a hero this way at 0:11 and undoes. With the Thief, pull the dragon north into the top-left corner. (0:13)
- With the Warrior, get below the orange crystal and push it north. The goblin is in front of it, so the crystal shoves the goblin up the column beside the statue. (0:23)
- Use the Thief to pull the crystal back out so the Warrior can get behind it from another side. Keep pushing until the goblin is in the top row, then push it west toward the dragon. The video undoes a few times here; aim for the end position. (0:27)
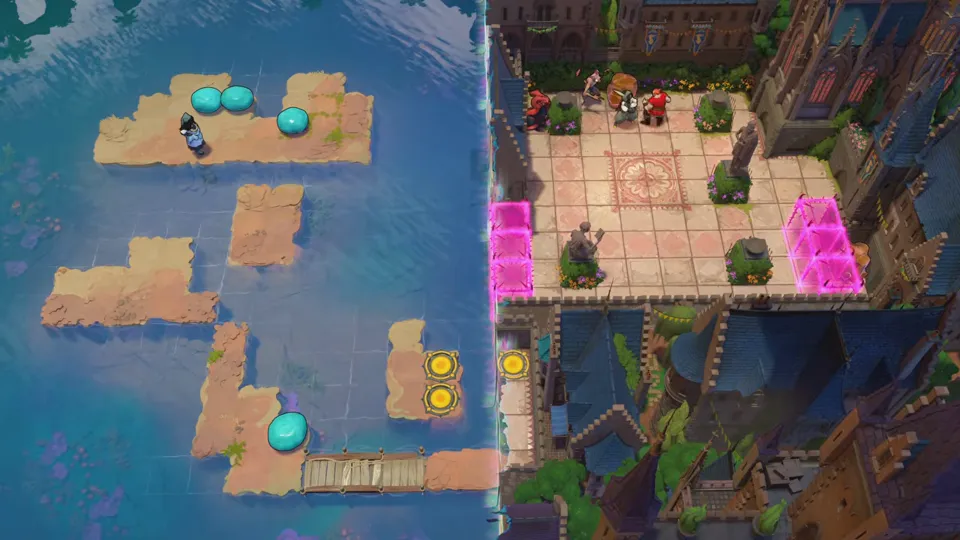
- When the goblin reaches the second column, right in front of the dragon, the two monsters take each other out. The pink gate and the pink cage turn into outlines. (0:58, gates open at 1:02)
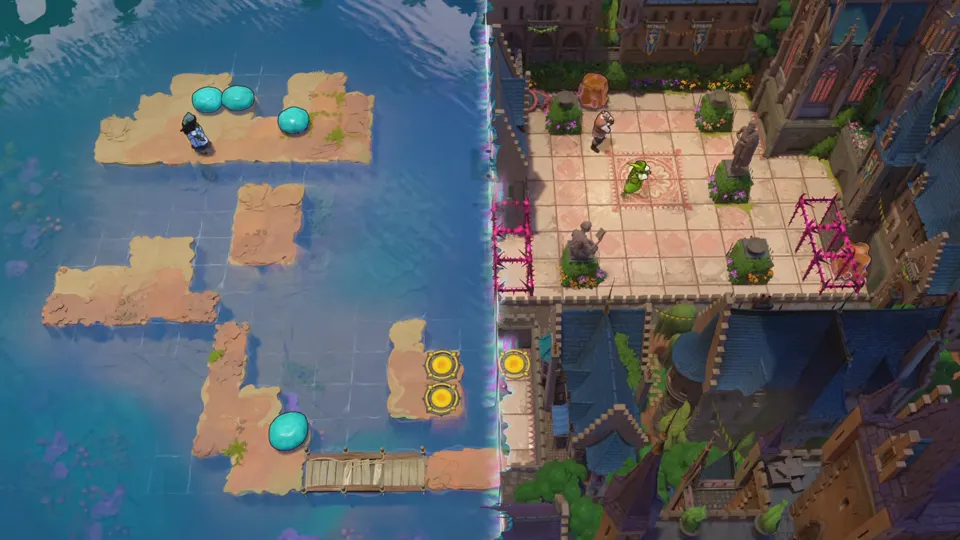
- With the Warrior, push the orange crystal out through the west gate into the water. Then fetch the second crystal from the old cage in the bottom-right corner and push it out the same way. The two crystals sit side by side in the water just north of the yellow-pad islet, and a hero can stand on them. (1:16, second crystal at 1:35)
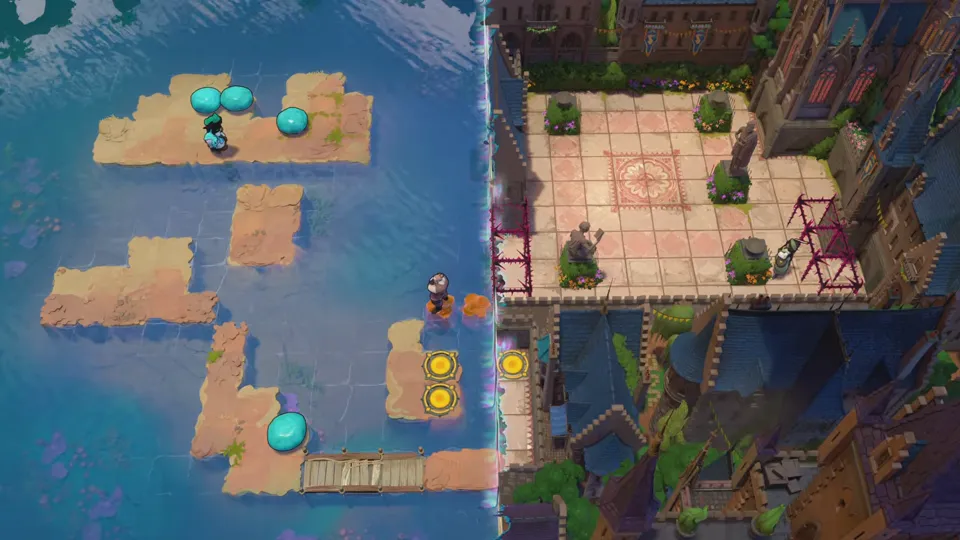
- Switch to the Sailor. Kick a stone south off the top island: it skips over the gap and stops on the small islet. Kick a second stone down the same line; it hits the first and sinks in the gap. (1:50, sinks at 2:02)
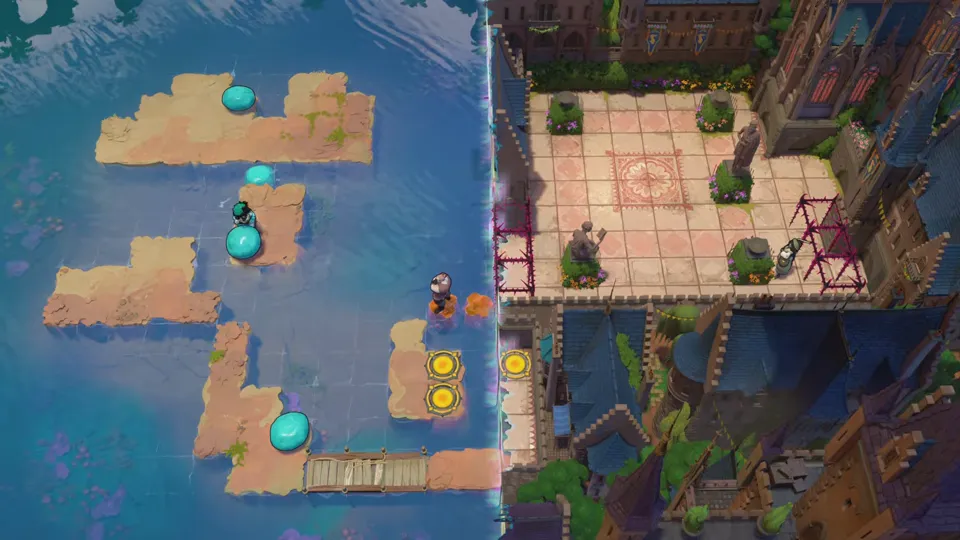
- Bring the last top-island stone down onto the islet too, then pave west the same way: send one stone across, skip the other into it, and it sinks in the gap between the islet and the L-shaped island. (2:10)
- One stone is left, so two-stone paving won’t work for the next gap. Push it to the east end of the L-shaped island and kick it east; it skips across and stops by the orange crystals. Leave the Sailor at the east end of the L-shaped island, and have the Warrior, standing on a crystal, kick the stone back west. It hits the Sailor and sinks right in front, joining the L-shaped island to the lower island. (2:37, kick back at 2:44)
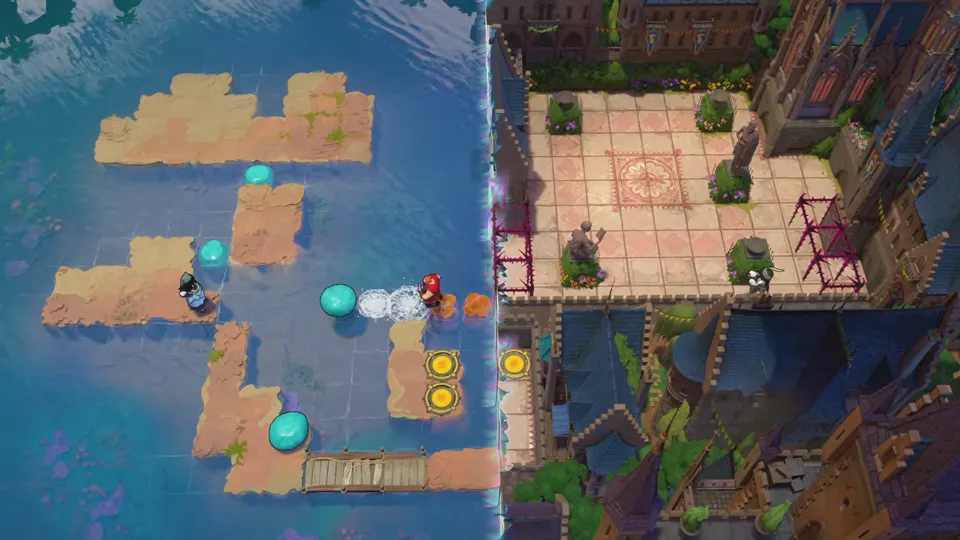
- Walk down to the lower island and kick its stone north. Then bring it back to the east end of the L-shaped island. The video takes a roundabout route through the top island here. (2:50)
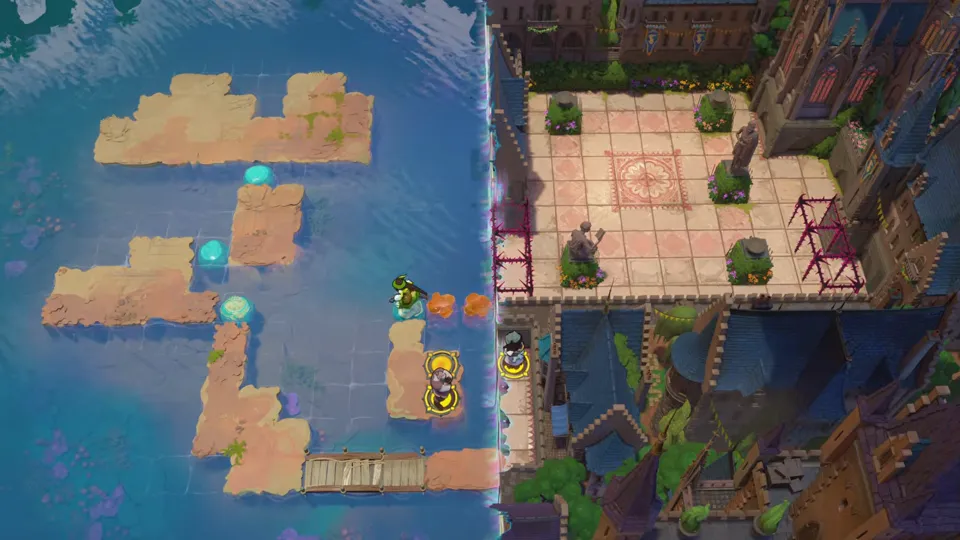
- Put a hero on the western orange crystal and kick the stone east. It hits the hero and sinks just west of the crystals, above the yellow-pad islet. (3:16)
- Walk the Sailor down to the lower island, east across the wooden bridge and up the strip on the heroes’ side to the yellow pad there. (3:20)
- Walk the Warrior and the Thief from the crystals over the new stone tile and onto the two yellow pads on the islet. (3:26)
The video doesn’t show the exact moves that bring the goblin into the top row, and it reworks the last stone several times in step 9. Follow the clip if your board looks different there.
MxB: Mirrors and Beamcasters
Key idea: the two heroes finish in each other’s world. The mirrors move the Explorer into the ruins to free the purple beam. A Mirror Isles mirror bends that beam back over the water, and the beam becomes the route home: the Trader rides it into the ruins, and the Explorer rides it out to the islands. (0:41)
An English no-commentary video of this room now exists (The Flying Chungus, 0:00–1:24); the steps below follow 塞德莎’s narrated video (part 22, where the room is called 黄金谜题[西5], “Gold Puzzle, West 5”). The name “MxB” is confirmed by the Steam achievement “Gold MxB” (“Open the MxB gold room”).
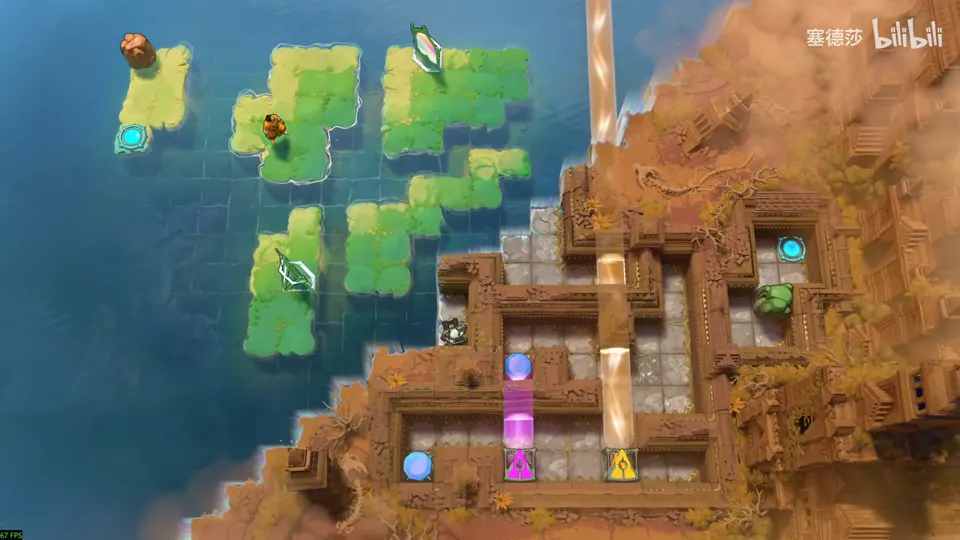
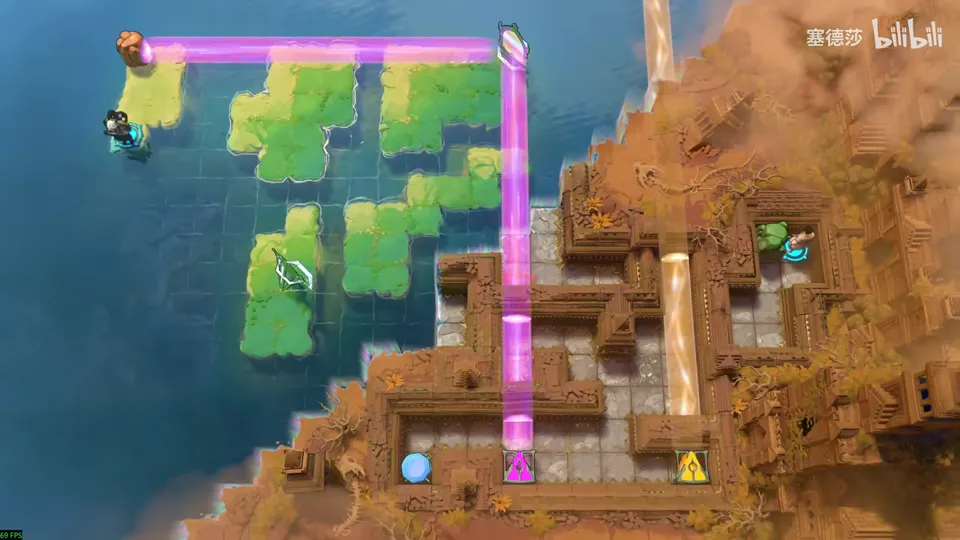
The layout. On the left is Mirror Isles water with a group of green islands. The Trader starts on the middle island in the top row. One mirror sits at the top edge of the island to his right, and a second one on the island at the lower left. A small yellow islet in the top-left corner holds a boulder, with the Trader’s exit just below it. On the right are Beamcasters ruins. The Explorer stands on a ledge at their west edge. The bottom corridor has a gem in a socket, a purple emitter and a yellow emitter. The yellow one fires an orange beam straight up through the ruins. A second, loose gem sits in the purple beam two tiles above its emitter, so that beam stops short. The ruins’ exit is in a small room at the top right, next to a green bush.
- Get the Trader to the lower-left island, directly above its mirror. In the video he gets there with two swaps: the top-right mirror drops him onto the stepped island in the middle, then the lower-left mirror lifts him onto the top of the lower-left island. (0:54)
- Push that mirror one tile south. Its east beam now crosses the water to the Explorer’s ledge, and its north beam reaches the island the Trader started on. (0:59) The clip rewinds briefly right after this, but the mirror stays where it was pushed.
- Switch to the Explorer, who is standing on the east beam, and use the mirror. The Explorer lands at the far end of the north beam, on the Trader’s starting island. (1:05)
- Walk the Explorer to the top-left corner of that island. The top-right mirror’s west beam reaches that tile, and its south beam ends on the stone floor inside the ruins. Swap, and the Explorer lands in the ruins. (1:06)
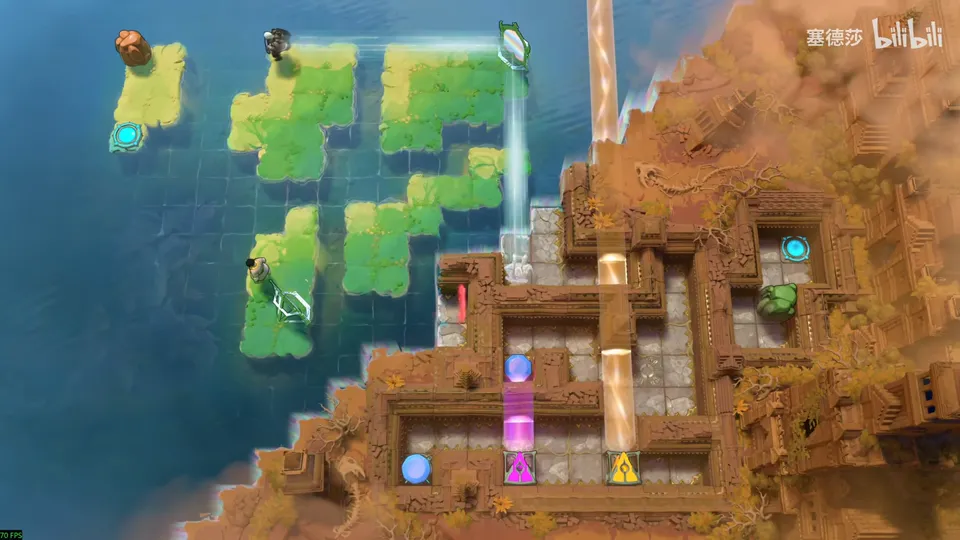
- Stand in the orange beam and use its two-tile jumps to get over the walls and down to the bottom corridor. The video takes two jumps. (1:09, 1:13)
- Take the gem out of the socket at the bottom left, and every beam goes dark. Walk round and pick up the loose gem that was sitting in the purple beam, then put a gem back in the socket. (1:16, loose gem at 1:19, socket at 1:22)
- With nothing in its way, the purple beam now runs all the way north out of the ruins. It hits the top-right mirror, which turns it west along the top row to the boulder on the Trader’s exit islet. (1:23)
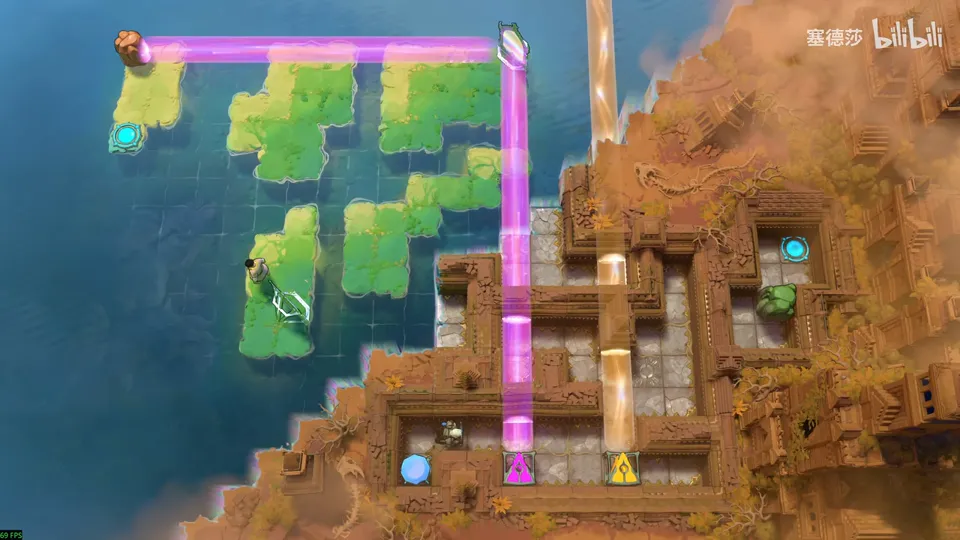
- Switch to the Trader. Use the lower-left mirror to swap him onto the stepped island in the middle, and walk to its east tip, right next to the purple beam. (1:41, swap at 1:46)
- Step into the purple beam. It carries the Trader down to the purple emitter in the bottom corridor of the ruins. (1:48)
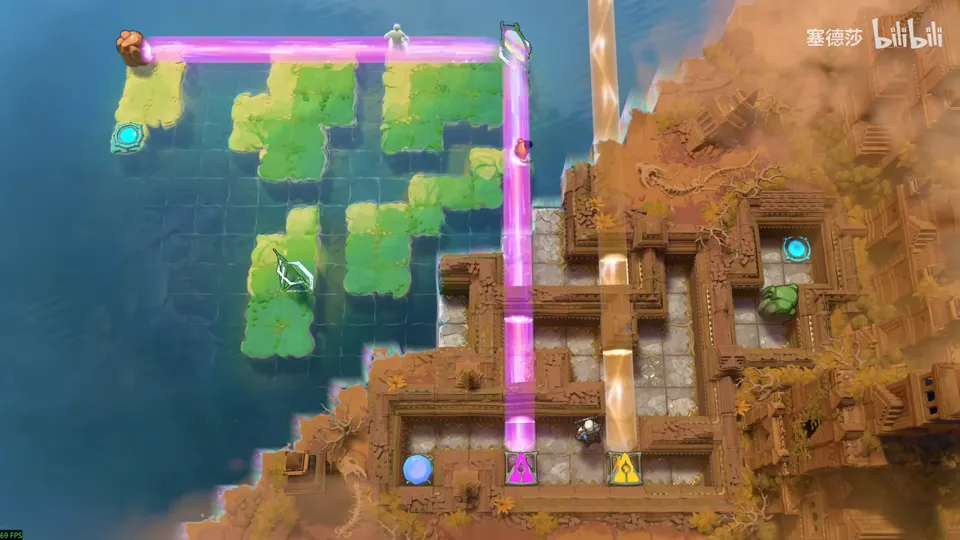
- Walk the Trader east to the yellow emitter and push it east. The orange beam moves with it and now runs up the corridor beside the exit room. (1:53)
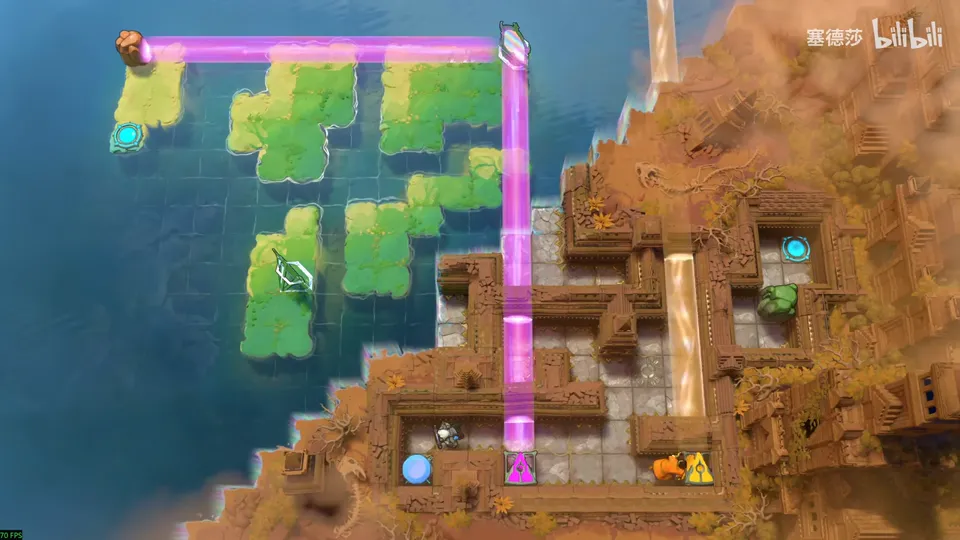
- Walk north beside the moved beam, step into it and jump east over the wall into the exit room. Step onto the exit. (1:55)
- Switch to the Explorer. Walk to the purple emitter and step into the beam. It carries the Explorer to its far end, beside the boulder on the top-left islet. Step down onto the Trader’s exit. (1:57)
The video has no subtitles we could read, so the order above comes from the frames. Two moments are unclear. Around 1:52 the Trader steps into the orange beam above the yellow emitter and then reappears beside it before the push. And the push in step 10 looks like it moves the emitter about two tiles. Follow the clip if your board looks different there.