Spoiler warning: this page covers the second ending, the end of the game’s second stage. It sticks to puzzle solutions and leaves out the story, but the way these rooms work gives away a late twist in how you play. If you haven’t finished Antipode High yet, you may want to stop here. The first ending is on The Antipode.
Endgame High is the second of the game’s three endgames: a big star at the end of Antipode High, the upper layer that opens after the first ending (see how to ascend). Here the rules turn round. Instead of solving levels, you design them: each room hands you pieces to place so that a hero can solve the level, and then you play it. This page solves the 2 overworld puzzles, all 27 rooms and the 2 optional bonus rooms that open after the ending. Finishing it unlocks the Steam achievement Endgame High (“Complete the Second Endgame”; see all achievements).
Where it is: 塞德莎 labels the star N6W5. His part titles also list S5W5, N6W4 and N5W5 for the area after the ending and its two bonus rooms; the video doesn’t say which tile is which.
How to use this page: there was no English solution video for these rooms when we wrote it, so the numbers follow 塞德莎’s narrated walkthrough, counted straight through his parts 43 and 44 in the order he plays them. Each heading has the key idea and a link to the moment the room starts; the numbered steps link to the second where he explains that move. Many rooms are about where to put a piece, and the narration often just says “here” over a top-down view. In those steps we describe the reasoning and link the frame rather than guess a tile.
Rooms at a glance (no name cards appear; the groups follow 塞德莎’s labels):
| Group (塞德莎’s label) | Our name | Puzzles | 塞德莎 part |
|---|---|---|---|
| 大地图解谜 | Overworld: lowering the yellow block | overworld puzzle 1 | P43 |
| 布局者入门 | Introduction: becoming the designer | 1–3 | P43 |
| 北 | North rooms (Heroes) | 4–5 | P43 |
| 东 | East rooms (Mirrors) | 6–8 | P43 |
| 南 | South rooms (Skipping Stones) | 9–12 | P43 |
| 西 | West rooms (Beams) | 13–17 | P43 |
| 东北 · 东南 · 西北 · 西南 · 南北 · 东西 | Pair rooms | 18–26 | P44 |
| 大地图解谜 · 验收关 | Overworld: the big map, then the final room | overworld puzzle 2, 27 | P44 |
| 附赠难关 | Bonus hard rooms (optional) | bonus 1–2 | P44 |
Rules that matter here
- You are the designer. A sign in each room says what to add and why; you place the pieces from above (framed drop spots, buttons on an upper floor, slots), then go down and play the level (P43 8:13, P43 10:12).
- Work backwards from the route. Find the tiles the hero (or a pushed object) must pass through; those can’t hold the new piece. What is left is usually one spot (P43 10:50).
- The signs are short on purpose. The game tells you so in a recording: the puzzle itself is meant to show what to do (P43 33:07).
- Everything keeps moving while you place. Falling gems, drifting lily pads and carts don’t wait. Several rooms are solved by running past something before it switches on (P43 1:02:13).
- Two-tile-tall things crush the Wizard. If he swaps with one, he dies, which is why some rooms are lined with tall crystals (P43 19:59).
- No overlapping in the final room. If two world blocks overlap, even under water, the exit won’t work (P44 35:36).
Overworld puzzle 1
Key idea: follow your instinct: a cart, a crystal skipping stone and a mirror together lower the yellow energy block in the middle. (塞德莎 P43 0:10)
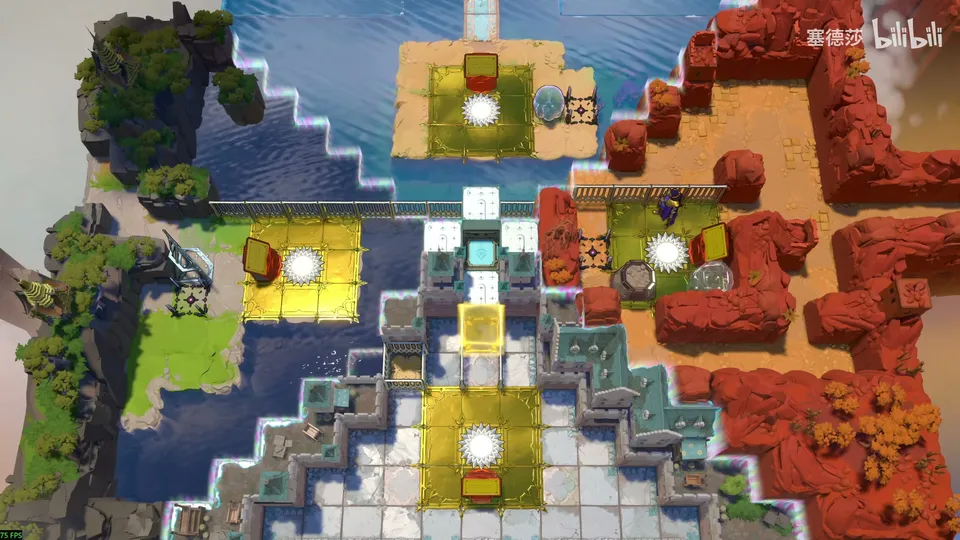
- On the east side of this block, push the cart out and all the way into the water; it will catch the crystal skipping stone from above later. (0:20)
- Teleport up and push the skipping stone onto the cart’s head, then go left. (0:41)
- The mirror is what gets the stone onto the button. 塞德莎 first puts it in the wrong place; the correct tile is shown at 1:04. Go to the bottom-right and wait for the skipping stone. (0:52)
- The yellow energy block in the middle lowers. Tip: wait for the cart to come back and put the stone back on its head. Otherwise, to repeat this you have to reset the skipping stone upstairs and redo it. (1:12)
Past the block are three signs and two recordings, which we don’t describe (1:49). The next sign takes you up into the first room (8:01).
Puzzle 1
Introduction: becoming the designer
Key idea: three small levels sit below you, and you drop one hero into each. Decide who can solve which. (塞德莎 P43 8:43)
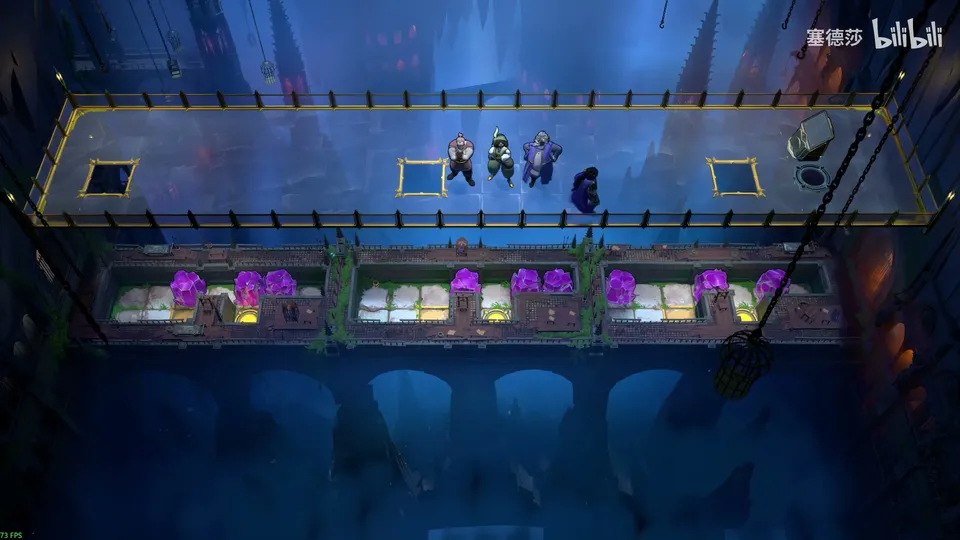
- First level: the Warrior can only stack the three stones at the right end, which blocks the exit, and the Thief can pull out only the first stone. So it’s the Wizard: push him down into it. (8:53)
- Second level: the Warrior clearly can’t, so the Thief. Third level: the Warrior. (9:13)
Puzzle 2
Key idea: the level is the Warrior’s second tutorial room from the North, in the same layout. Add one more crystal through one of the framed spots without making it unsolvable: rule out every tile the Warrior’s route needs. (塞德莎 P43 9:48)
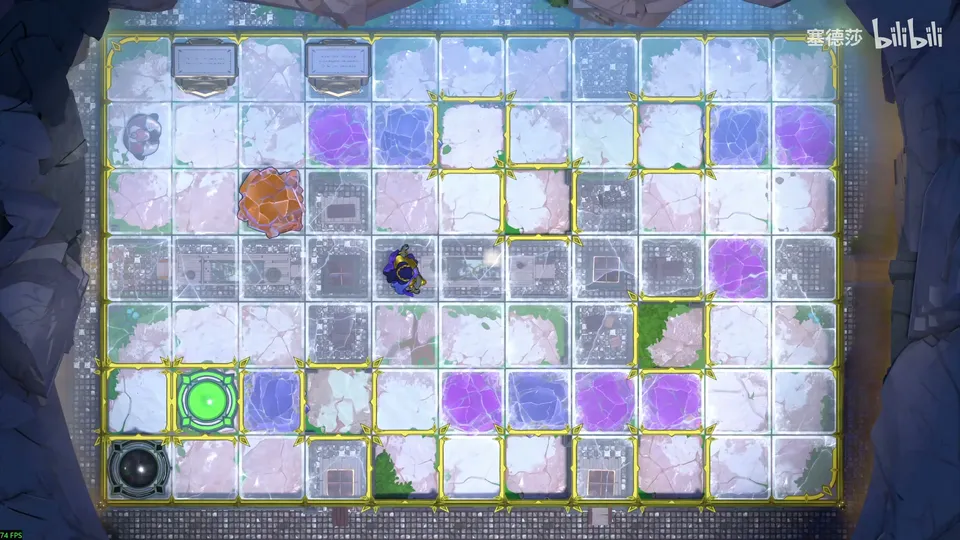
- You may only drop into the framed tiles. (10:12)
- At the start, pushing any stone right blocks the way, so both stones here must be cleared, up or down. Either way the tiles above and below them must stay empty. (11:05)
- Further on, the tile on the walking line can’t take a stone, and before pushing the group of four left you must push one stone up or down, so those tiles stay empty too. (12:11)
- Coming in from the top to push the next stone down leaves one framed tile free. The last two stones go all the way left, so their tiles are out as well. (13:08)
- That leaves exactly one spot; drop the crystal there and play the level as the tutorial. (13:37)
Puzzle 3
Key idea: the same exercise with the Thief’s tutorial. Every stretch of his route is fully used, so the only free tile is the one just above the exit. (塞德莎 P43 14:27)
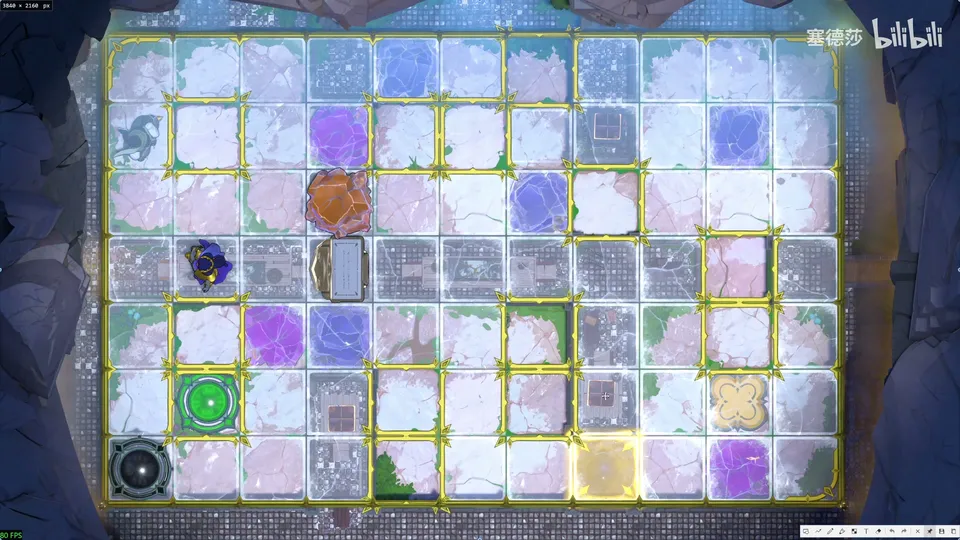
- The Thief must pull the first stone left, then gets dragged along and must go straight down as in the tutorial; no room for an extra stone anywhere on the left. (14:41)
- The middle and right sections are just as tight. (15:27)
- The exit itself can’t take a stone (you couldn’t pull it off), so drop it on the tile above the exit. (16:15)
Puzzle 4
North rooms (Heroes)
Key idea: place seven goblins so the floating Cleric can make his way to the exit. Plan backwards from the exit. (塞德莎 P43 17:28)
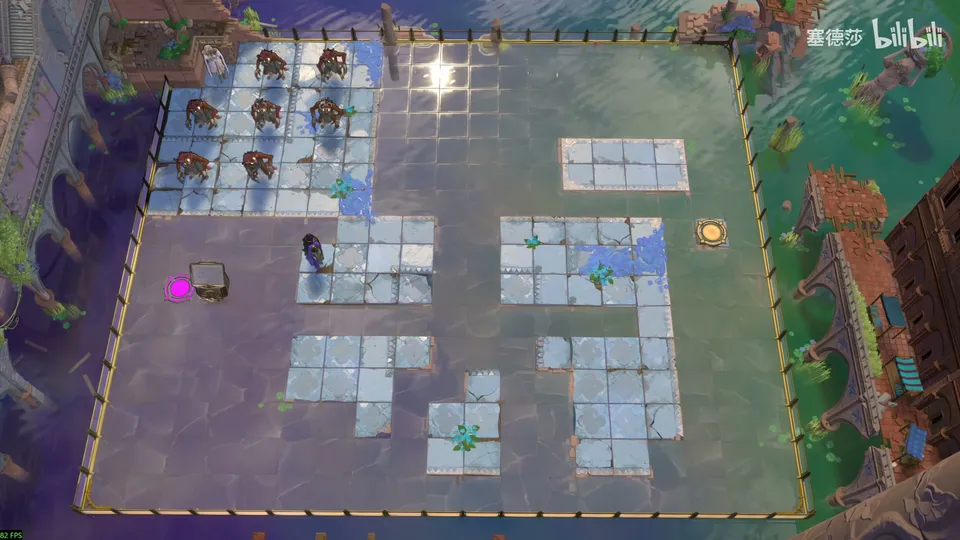
- By the exit, three goblins on these three tiles; that is the fewest possible. (17:43)
- Three more for the lower part: push this goblin over here, then place two. (18:04)
- One last goblin lets the Cleric turn left and come down at the end. (18:31)
- Walk him round. (18:49)
Puzzle 5
Key idea: four blocks on the buttons upstairs each put a wall on the matching tile of the 7×7 room below. The edge is lined with two-tall crystals that would crush the Wizard if he swapped with them, so walls must cover every swap that would kill him. (塞德莎 P43 19:06)
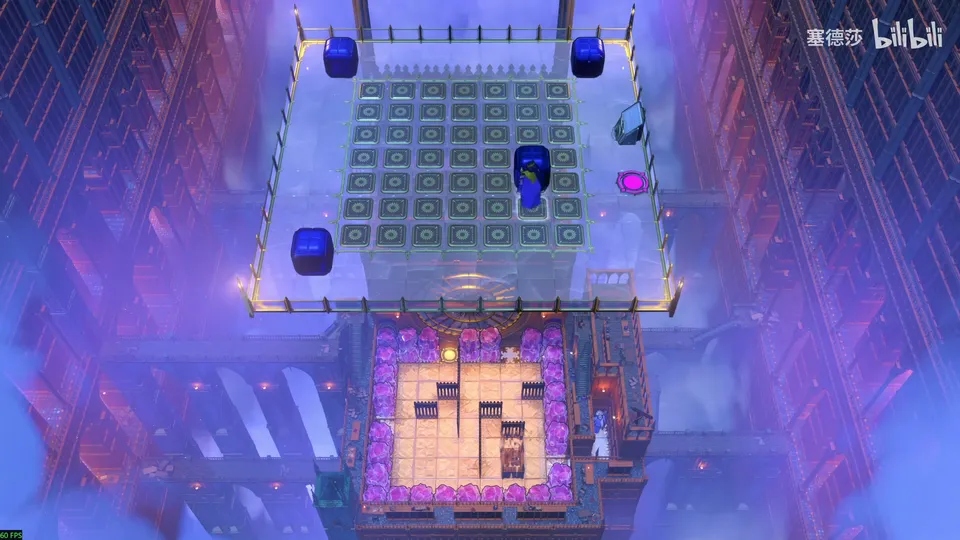
- The answer isn’t unique, but the Wizard’s route almost is. At the start, the two stones on the left would swap with him, so that spot needs cover. (20:14)
- Going round to the left costs three walls; going right uses two gaps that are already there and costs two. Go right. (20:34)
- Coming down and left needs a wall here, which gives the rough plan: one wall on the left half, one below, one at the top-right. (21:45)
- For the way up, put a wall on the topmost tile; the same wall also covers the step right. (22:01)
- The bottom-left wall is free: either of the two lower tiles works. (23:17)
- Place them (the top ones are fixed) and walk: 塞德莎 goes up, left, up to the end, then down, left, up, left, left, up, up, right, right, up, up. (23:41)
Puzzle 6
East rooms (Mirrors)
Key idea: the islands are the third Mirror Isles tutorial room, slightly changed. Drop two stones into the water to extend the land (the exit only opens once both are in) where the tutorial route is missing ground. (塞德莎 P43 24:28)
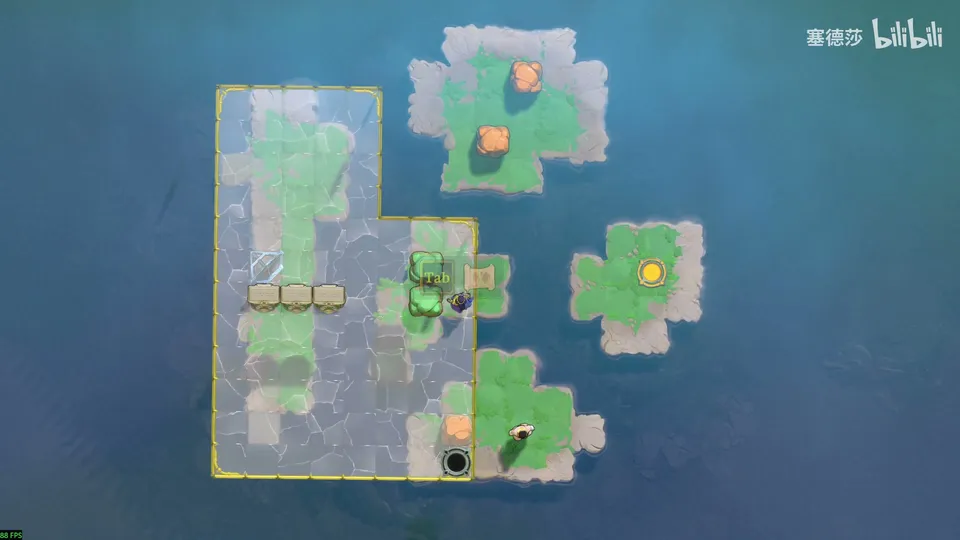
- Plan the tutorial route: pave with a stone, reach the middle island, use the mirror, push the mirror up to the top-right island, fill two gaps and take the mirror out again. A missing texture near the bottom is a bug he has reported. (25:03)
- Two things are missing. One stone goes into the gap that is two tiles wide. (25:46)
- The other goes at the top-left, because the mirror is against the edge and can’t be pushed out; either of two tiles works. (26:01)
- Drop them and play it through: push the mirror out, reflect down, push it up. (26:20)
Puzzle 7
Key idea: drop three mirrors through three slots, each facing a way you choose, so the Trader can finish. The goal is the top-left island, and on that diagonal only a mirror at the bottom-left can send you there. (塞德莎 P43 27:16)
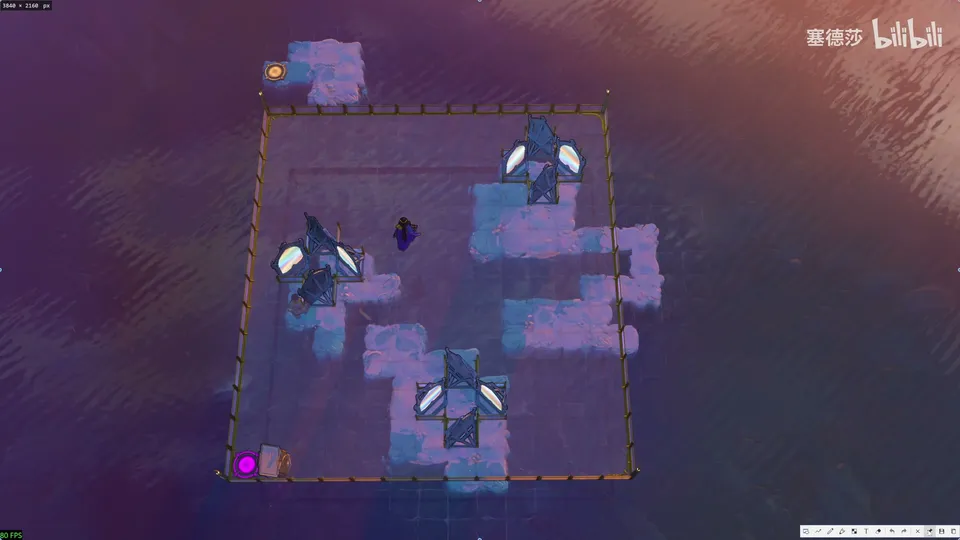
- Push the first mirror right, reflect in, then push it left and down; from the first island you reflect to the bottom-right. (27:54)
- To stretch the mirror’s sideways distance you need the top-right island, so the mirror dropped there can only face one way. (28:15)
- It then blocks the way, so reflect back from the third island and push it into the water. The top-right island’s mirror faces the same way. (28:36)
- Move this mirror over, reflect back, push it aside, reflect to the top-right island, then up to the top-left island. Watch the orientations he settles on at 29:15. (28:56)
Puzzle 8
Key idea: “give this poor soul a goal he can reach”: you place the exit, on top of a pillar about six tiles high, and the only way up is a vertical mirror. Test each spot for two things: can a reflection reach the top at all, and is the distance long enough? (塞德莎 P43 29:57)
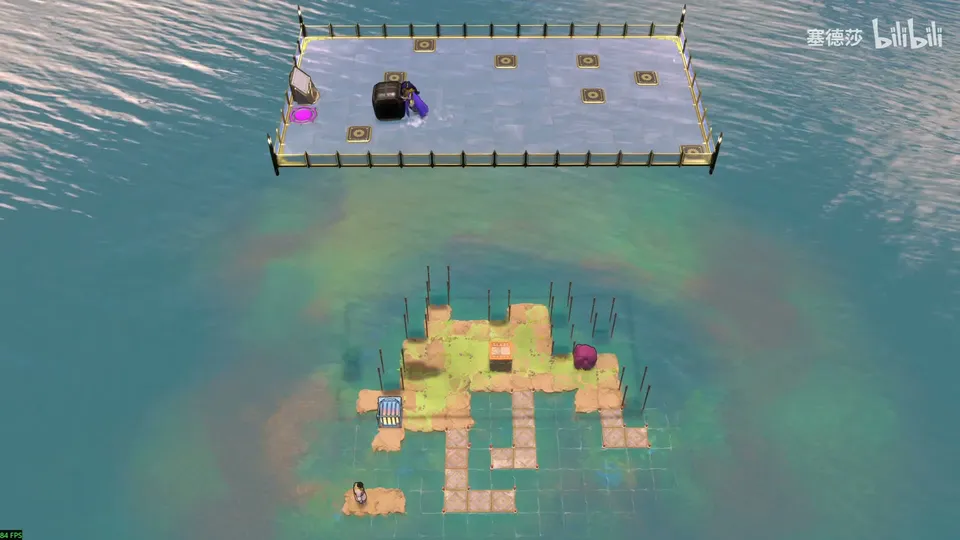
- Most spots fail: some can be reached but the reflection is far too short, one can’t be reached because the water below can’t be filled, one is cut short by a ledge. (30:24)
- The one that works is the spot he leaves unzoomed: you can push the stone off the right side of the lower platform, which makes the distance long enough. (31:27)
- Play: drop the mirror from below, push it up, then reflect left; the mirror is out. (31:46)
- To get left of the stone, use a vertical-mirror drop: stand here, reflect, and reflect back at the right moment. (31:55)
- Push the stone down, put the mirror in place and reflect up to the goal. (32:14)
Puzzle 9
South rooms (Skipping Stones)
Key idea: place one lily pad so it ends up on the target tile. Its route must be up, right, then down, and only one of three ways to do that works. (塞德莎 P43 33:28)
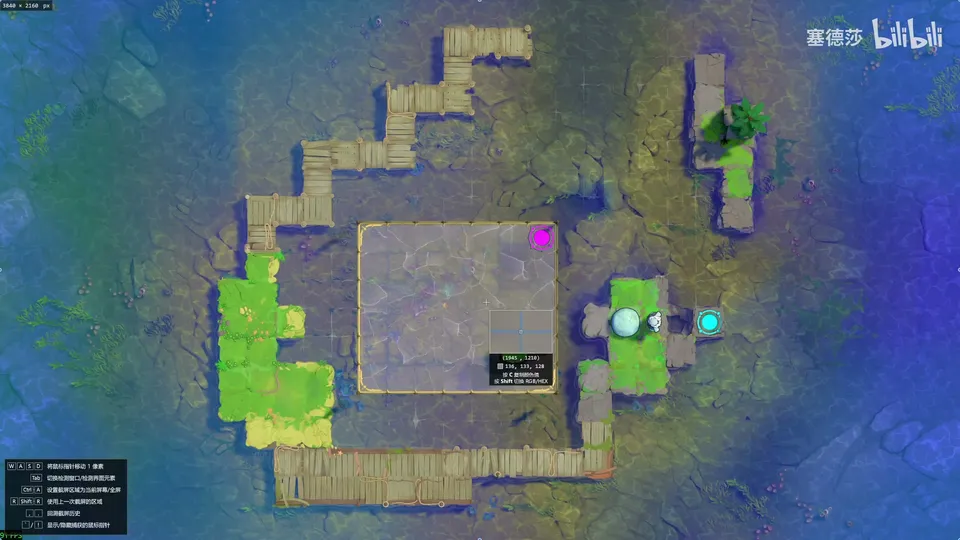
- The first route fails because the pad gets stuck and can’t turn down. (34:02)
- The upper route also fails: you would have to hit the pad from above or below, and the tiles in that column are one tile wide, so no stone can be pushed there. (34:11)
- So the pad belongs in this column. The simplest choice: put it where you can hit it up on the way while pushing the stone left to free it. (34:49)
- Play: push the stone left, hit the pad up as you pass, push from below, then right. (35:41)
Puzzle 10
Key idea: three lily pads become the stepping stones, and the fourth is there to stop the crystal floating left. The crystal sits on a pad of its own, which is easy to miss. (塞德莎 P43 36:16)
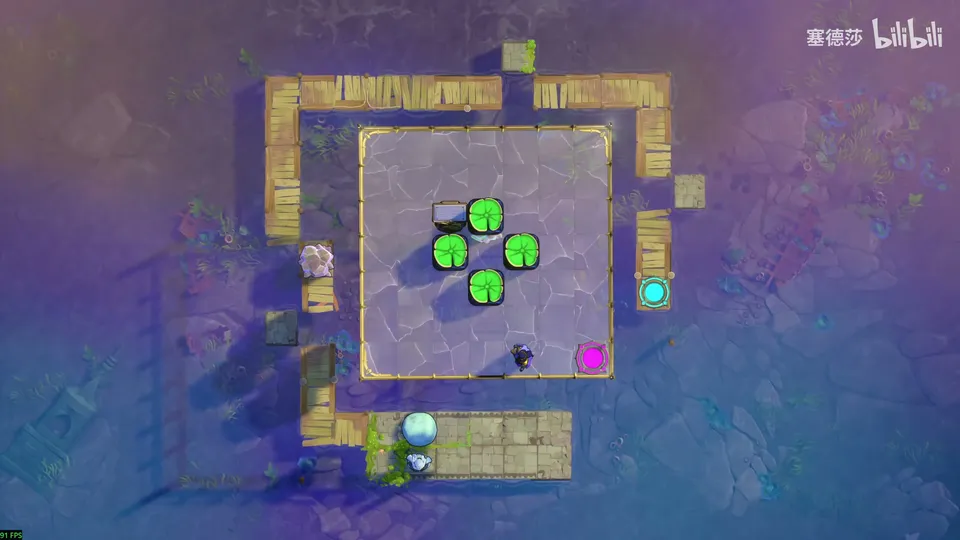
- Three pads have to end on these three tiles; with only one skipping stone, their routes are fixed: push up from below, hit one left, one right, and one straight up. (36:29)
- The last hit also knocks the crystal’s pad, which drifts left and jams the way. Put the fourth pad on either of these two tiles to stop it. (37:13)
- Play: one pad left as the blocker, the others on their tiles, push up and walk across. (38:04)
Unintended solution, as 塞德莎 notes: skip the blocker and push the stone down fast enough. (37:51)
Puzzle 11
Key idea: “complete the terrain for our friend”: add three pieces of ground so the stone you start with can be worked round and freed, then pushed onto the top-left island to wake the lily pad. (塞德莎 P43 38:28)
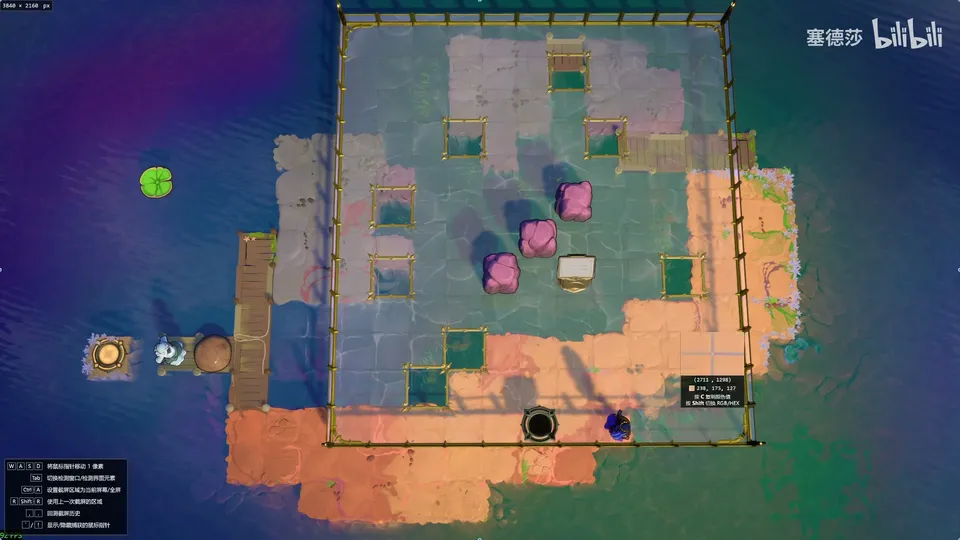
- You can only push the stone right at first. Without help it gets stuck after one push up, so add ground here to keep pushing right. (38:44)
- A second piece here lets you push it down into a better place, then right, up and round. (39:41)
- The third piece goes where you can push it left onto the top-left island. (40:24)
- Play: right, up, right, down, right, up, right, down, and the stone is free; push it left. (41:04)
Puzzle 12
Key idea: the intended solution leaves five lily pads on the five middle tiles so you can walk across. Four coloured stones set the direction of a current where you put them: blue up, yellow down, green left, pink right. (塞德莎 P43 41:51)
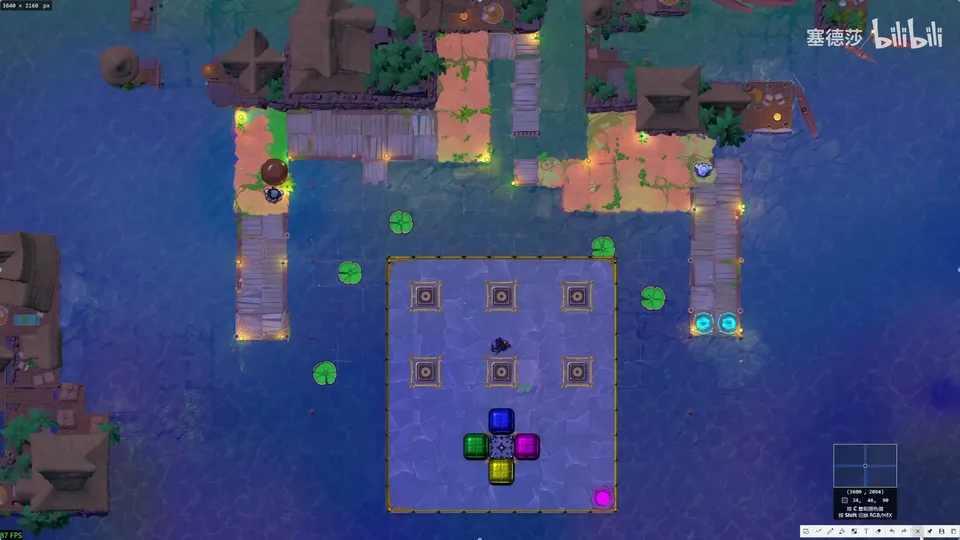
- What the stones do: each makes a current in its colour’s direction on the tile you place it on. (43:06)
- The lowest pad can only be hit down from above, which loses the stone for good, so it goes last. It drifts right, so an upward current must sit here. (44:07)
- Every other pad must be hit sideways. This one only works hit down, and a floor tile blocks its direct way, so it loops round: left current here, down here, right here. (44:49)
- Check the rest: one goes straight left, one straight right, one right from above and then down into the rightward current. (45:53)
- Place the stones as planned and play it out; every stone can be recovered. (46:22)
Unintended solution: knock any pad over to the left shore and ride it straight across. (47:40)
Puzzle 13
West rooms (Beams)
Key idea: choose where the gem goes. It powers every beam but also blocks them, so check which beams must pass: the one beam that must not reach its target is the one the gem has to block. (塞德莎 P43 48:05)
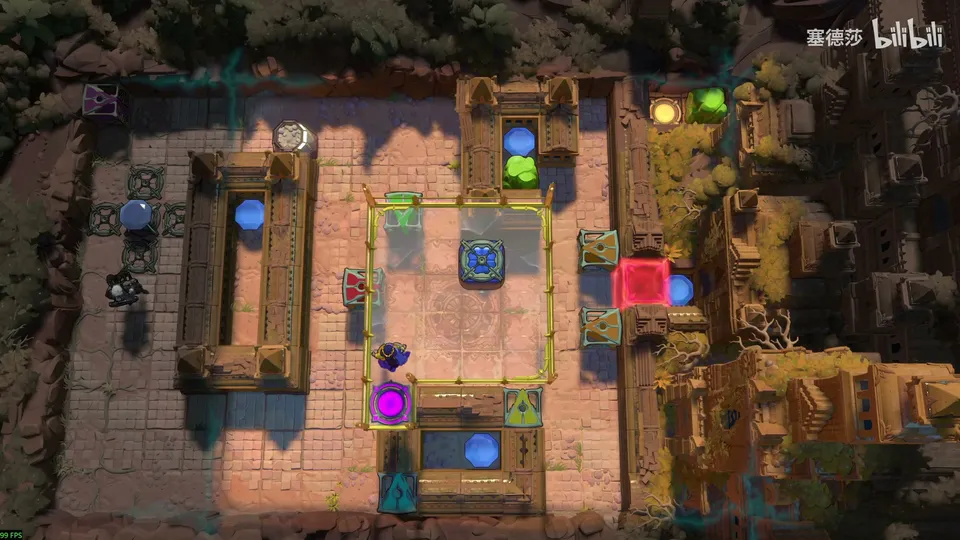
- Take the gem at the top-left; it goes into the spot you choose and turns on all the beams. (48:25)
- Right: the red beam must cross unhindered to the red door. Top: yellow breaks the stone, and orange must jump you two tiles over the wall. (48:40)
- Bottom: only green gets you through the wall, but where it fires now you couldn’t get out. Push the green emitter up and let the cart shove it one tile right. (49:30)
- Left: the lower orange beam must reach, the upper one must not, or you can’t step onto the gem. Only the gem can block it, so it goes on the top row of the 4×4 glass, third tile. (50:15)
- Play: collect the gems one by one, waiting for the cart to push the green beam right, then teleport out on the purple beam. (50:59)
Puzzle 14
Key idea: drop six emitters of six colours into place. Work along the route from the top-right: every obstacle on the way has exactly one colour that clears it. (塞德莎 P43 51:43)
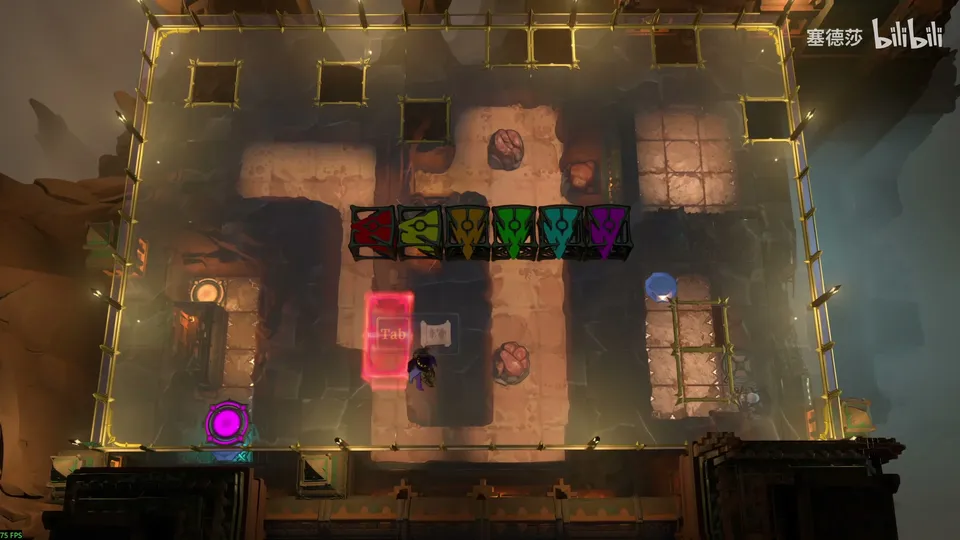
- Getting to the top-right is easy. From there the only way on is to break this stone and jump out: yellow here, with an orange beam pointing down above it. (52:07)
- The left-firing red beam can only go here, opening the first red door directly. To reach it you must be inside the wall, so green goes here; the second door then opens directly. (53:00)
- Only cyan can shift the stone in the way, so cyan here. Purple at the top-left gets you to the gem at the goal. (53:27)
- Place red, green, cyan, yellow, orange and purple, then play. (53:56)
Puzzle 15
Key idea: arrange a 2×2 pocket world that wraps round at its edges. The stone in the goal block can only be broken from inside the wall: the green beam firing left carries you in, and the yellow beam firing up in the fifth column breaks the stone. (塞德莎 P43 54:50)
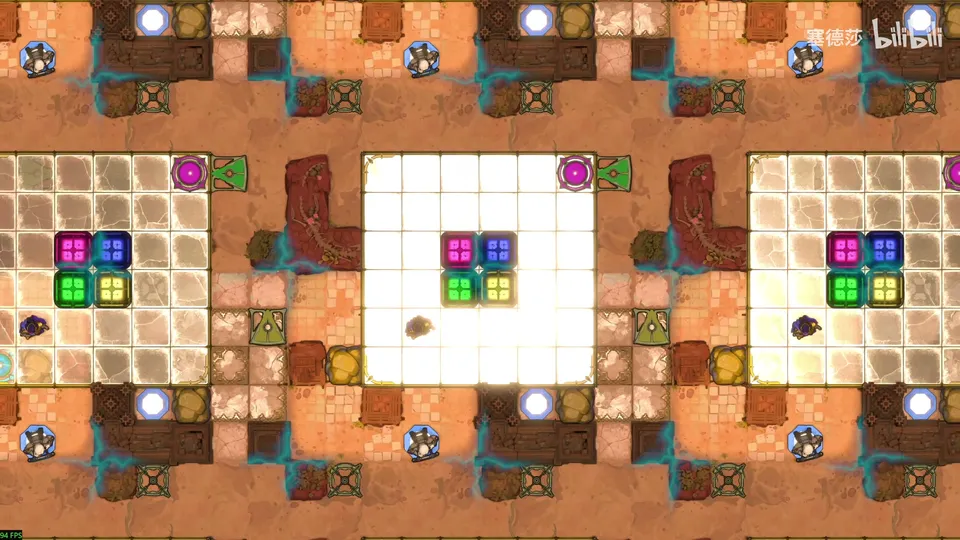
- The goal block holds a stone you must clear. (55:12)
- Using the yellow beam in the third row doesn’t work: it only hits the left stone, which has a wall on its left that the green beam can’t reach. (55:41)
- So use the upward yellow beam in the fifth column on the right-hand stone; the green beam firing left reaches that wall, so you can walk in. (56:17)
- Place the green block roughly here and the last block in the remaining spot. Collect the gems (the second one first), activate, then walk through the wall and break the stone. (56:39)
Puzzle 16
Key idea: the prism changes the colour of any emitter. Seven emitters, seven colours (red, green, yellow, orange, cyan, purple, blue), each used once. (塞德莎 P43 57:27)
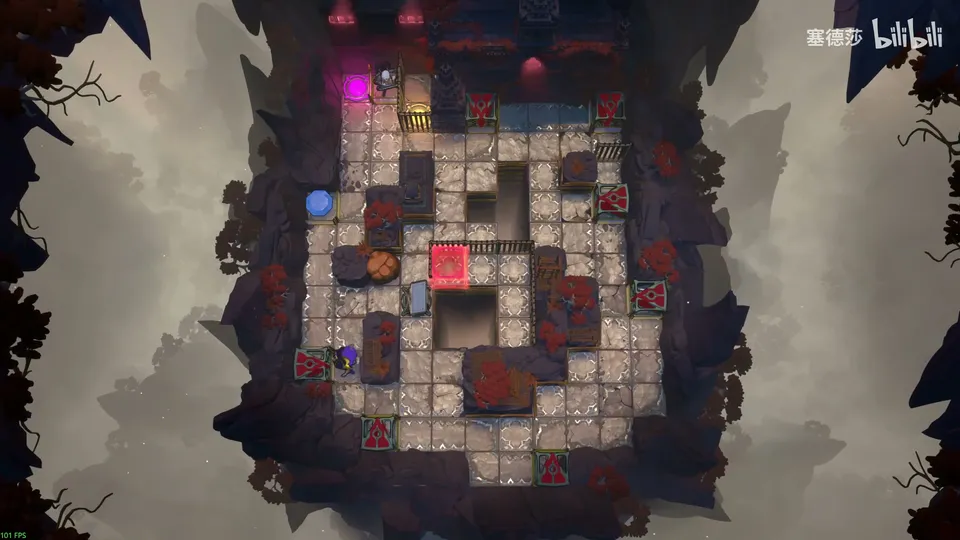
- The goal is fenced in, so the upward emitter becomes blue to walk through the fence. (58:03)
- A stone is in the way, and only yellow can break it. The left-firing emitter under the sign can’t be yellow (the gem slot is there), so another emitter fires yellow at the stone’s right side. It is too high, so make the one that pushes it down cyan. (58:19)
- A fence blocks access to that emitter: make the upward one below it orange and jump in. (58:59)
- The red energy block in the middle: keep that emitter red. To get in, make the left one firing right green; to get out, make one purple and ride its end. (59:15)
- Play: place the gem, jump in at the top-right and push the emitter down, go through the wall at the bottom-left, open the door, ride the purple end out, then break the stone. (1:00:05)
Puzzle 17
Key idea: place three floor tiles on the cliff edge. One fills the gap above the activator, so you can drop the gem onto it and run past while it falls, before the purple beam switches on. The other two let you stack two gems and push them down onto the bottom-left activator. (塞德莎 P43 1:00:37)
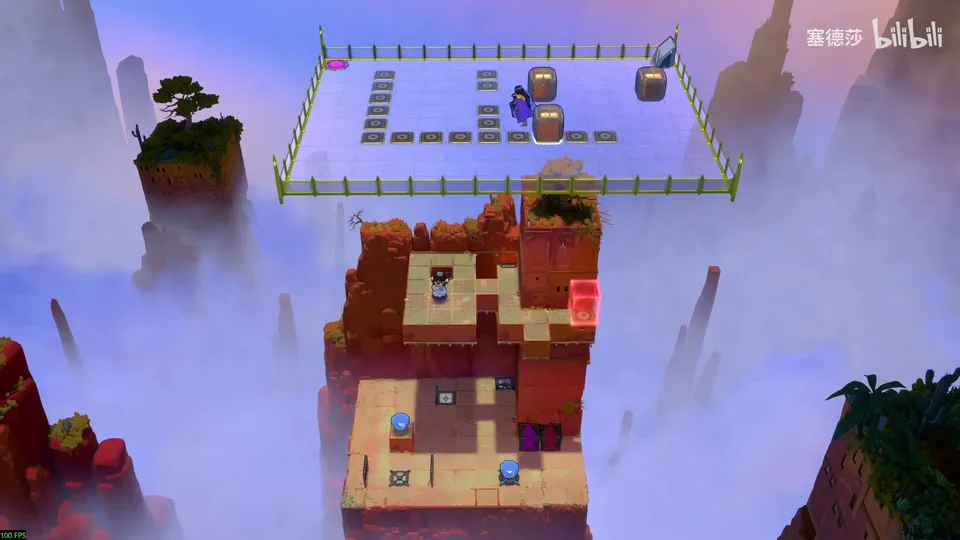
- Turning on the beam below is the only way through the door, but once on, its purple beam pulls you down when you walk past. (1:00:53)
- Going around it would use all three tiles and leave none for the gem on the left. Instead, one tile over the gap above the activator: drop the gem in and run across while it falls. (1:01:30)
- The bottom-left activator is boxed in by cliff, fences and wall, so stack two gems on the platform and push the two-tall pile down from above. Two tiles here and here let you drop the gems there. (1:02:38)
- Not these two other tiles: they block the hole you drop through to the platform. (1:03:48)
- Play: carry gems up with the two elevators, drop each and push it down; then push the last one off and dash across at once. (1:04:07)
That completes the four single-world groups. Six pair groups follow. (1:05:13)
Puzzle 18
Pair rooms · Heroes × Mirrors (NE)
Key idea: place a purple energy block (in water it rises as new floor) and a blue button. Work out the run first: the floor rescues the mirror stuck at the edge, and you finish by reflecting off the blue button. (塞德莎 P44 0:11)
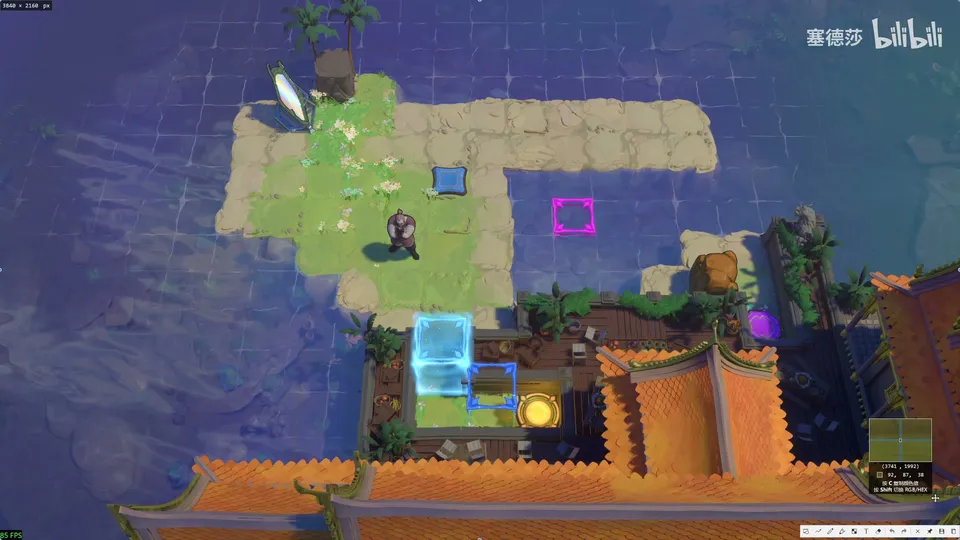
- The mirror is against the edge, so it can only go right. Push it here, reflect, push the stone onto the button. (0:51)
- With the purple block here, the button raises floor next to the mirror and you can take it out. (1:05)
- The blue button opens the gate, but it has to be let go once you are inside. Stand on it and reflect straight in, which leaves the button. Draw the diagonal from the mirror’s spot: that is where the blue button goes. (1:23)
- Play: mirror right, reflect, stone on the button, take the mirror out, place it, stand on the blue button and reflect. (2:18)
Puzzle 19
Mirrors × Stones (SE)
Key idea: place two exits far out in the sea. A mirror carried away on a drifting lily pad keeps getting further, so it can reflect you a long way: one exit straight below, one at the top-right. (塞德莎 P44 2:58)
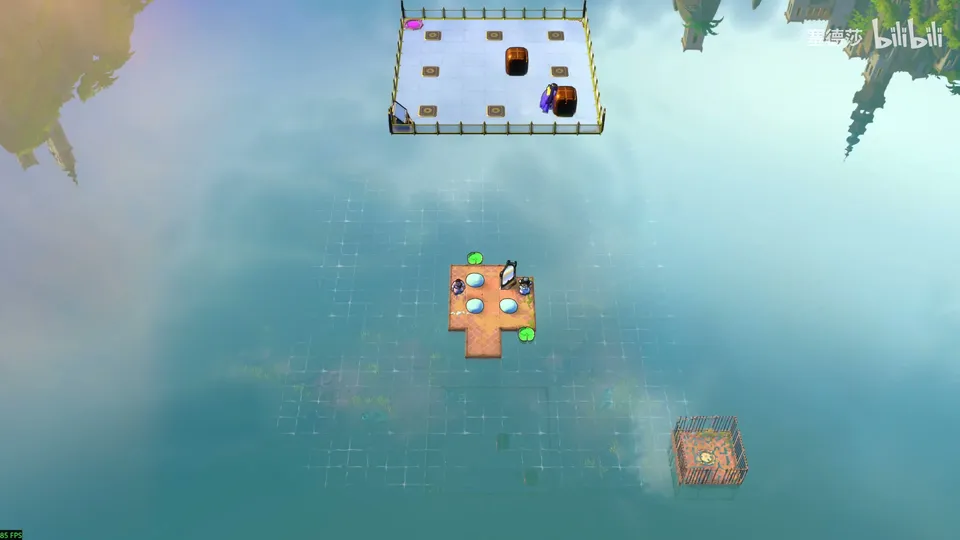
- Hit the lower lily pad right with a stone; a mirror placed nearby reflects further and further down as it drifts away, so put an exit far below. (3:17)
- Put the mirror on the upper pad, start it right with a stone and hit it up at the empty corner; the mirror runs up its column, and from here you reflect to the top-right. Put the second exit there. (4:10)
- Play: one hero on the pad, mirror here, start the pad; near the end, move the mirror onto the pad, set the two stones and hit it up at the right moment. (5:03)
Puzzle 20
Key idea: move three plank bridges so three crates can be reflected down to the Trader at the bottom-left. Count diagonals: the highest one can’t reach the right-hand spot. (塞德莎 P44 5:34)
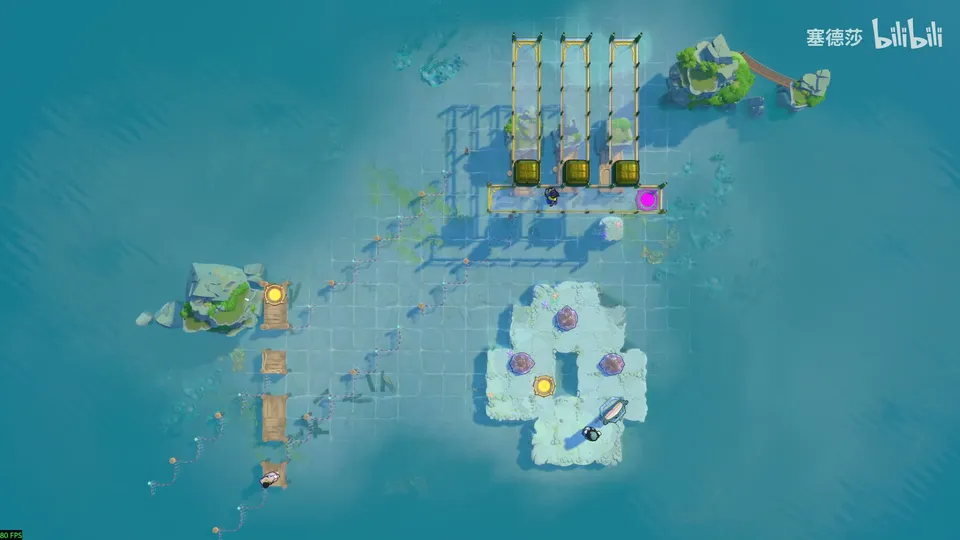
- The lowest crate reflects last, from one of the two lower spots. The middle one has a pool in the way, so left or right only. (5:43)
- The top one is too high for the right-hand spot (14 tiles along the diagonal leaves the area), so give it the left spot. (6:24)
- The right-hand bridge isn’t unique; a floor tile there means a quick, timed push. Place the bridges. (7:21)
- Play: push the first straight up and reflect to the middle; for the others, push left and reflect from inside, because a floor tile is in the way. (8:08)
Puzzle 21
Beams × Heroes (NW)
Key idea: five small levels in a row, each with one emitter whose colour you pick (red, green, orange or purple). Each level has one colour that works. 塞德莎 gives the outline only. (塞德莎 P44 9:09)
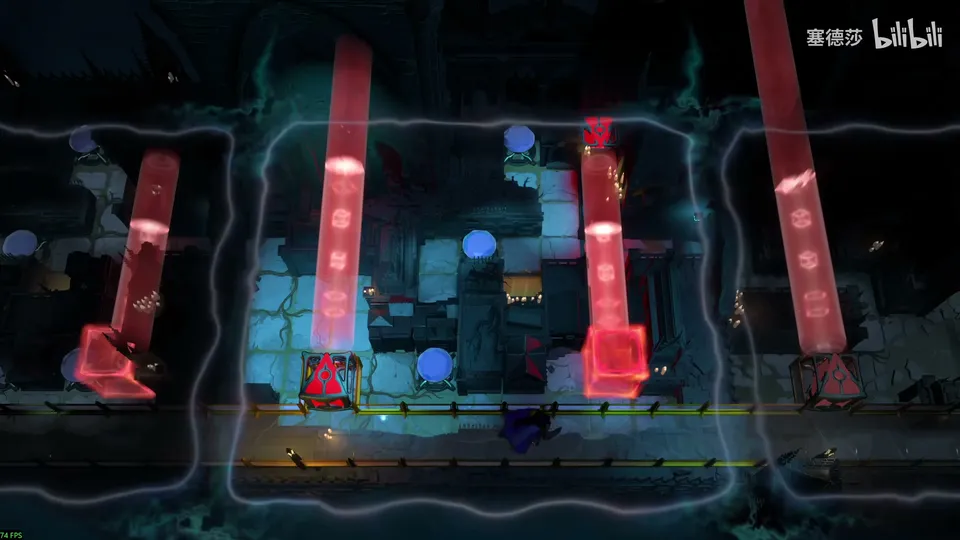
- Level 1 green (walk through the middle wall); level 2 purple (ride its end up to the gem and open the door). (9:45)
- Level 3 orange (jump in bit by bit); level 4 red, the only one that opens the door there. (10:07)
- Level 5 is a trap if you choose orange: you land next to the goal and fall when you move. It has to be purple, and not the bottom-left emitter, because you couldn’t get it back out. So the top-right is purple, and the other one green to get it out. (10:33)
- Play each level with the Warrior and the Thief. In level 3 only the Thief can get in; jump once more before going right so you don’t pull the gem. (12:06)
- Level 5: in and out with green, the Thief pulls, drag the purple emitter to the bottom-left, go through the wall to push it down, then move it to the far right. (13:16)
Puzzle 22
Stones × Beams (SW)
Key idea: share out opaque and see-through (crystal) skipping stones between three islands. Work backwards: every exit is reached by riding a purple beam’s end, so each needs an opaque stone to end the beam and see-through stones underneath as footing. (塞德莎 P44 14:04)
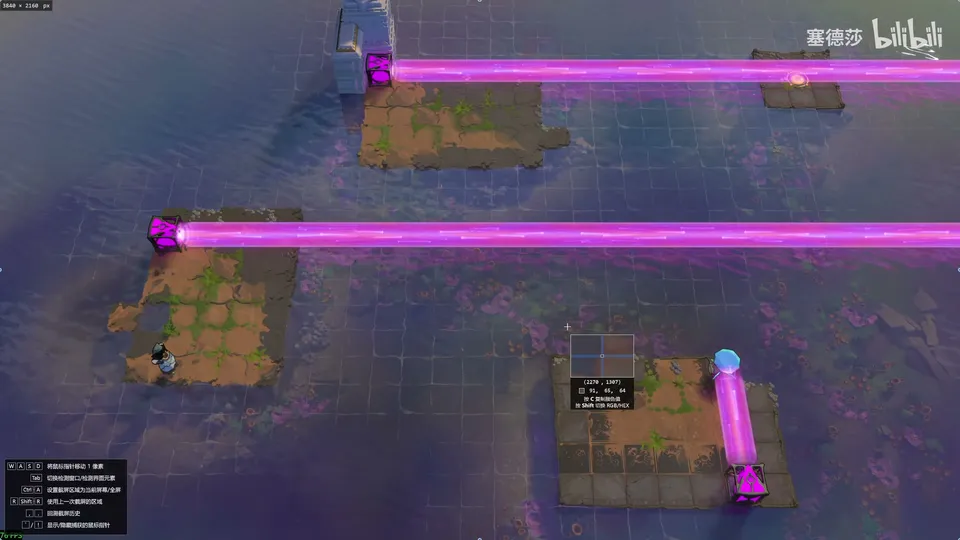
- Third island: an opaque stone as the end, a see-through one sunk below as footing; then two more (stacked) beside it so you can come from the side and push the end stone away. (14:27)
- To push that opaque stone in, the purple beam must be blocked first: one more opaque stone. Three see-through and two opaque here. (15:50)
- Second island: one opaque as the end, one see-through as footing. First island: one see-through. (16:19)
- Drop them so they don’t stack: the Sailor below can’t push a stack. (17:18)
- First island needs only one: push the beam down and push the stone up into the water at that moment. (17:28)
Puzzle 23
Heroes × Stones (NS)
Key idea: choose three of five heroes and drop them left, right and top. The real job is a three-tile path for the top hero. Only the Druid can stop a skipping stone halfway, and only the Bard can draw the stones out from the side wall. (塞德莎 P44 18:38)
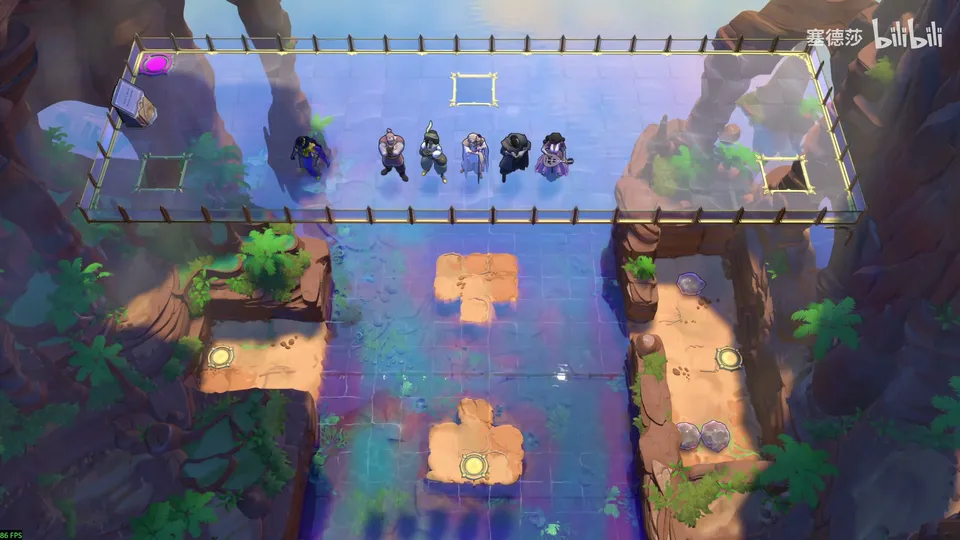
- The exits are left, right and bottom; the side heroes only help. (18:41)
- The Druid is the only one who can catch the middle stone. (19:04)
- The Bard goes left, since the Warrior can’t get the stone off the side wall. The Cleric and the Thief are no use here. (19:48)
- Play: the Bard waits here so stones stop inside him and he carries two. Throw the third, the Druid catches it, then the rest; line the last one up with the wall. (20:17)
Puzzle 24
Key idea: put four pieces of terrain in order so the Cleric reaches the right. You have three skipping stones (the Sailor is below); choose the joins that cost the fewest. (塞德莎 P44 21:05)
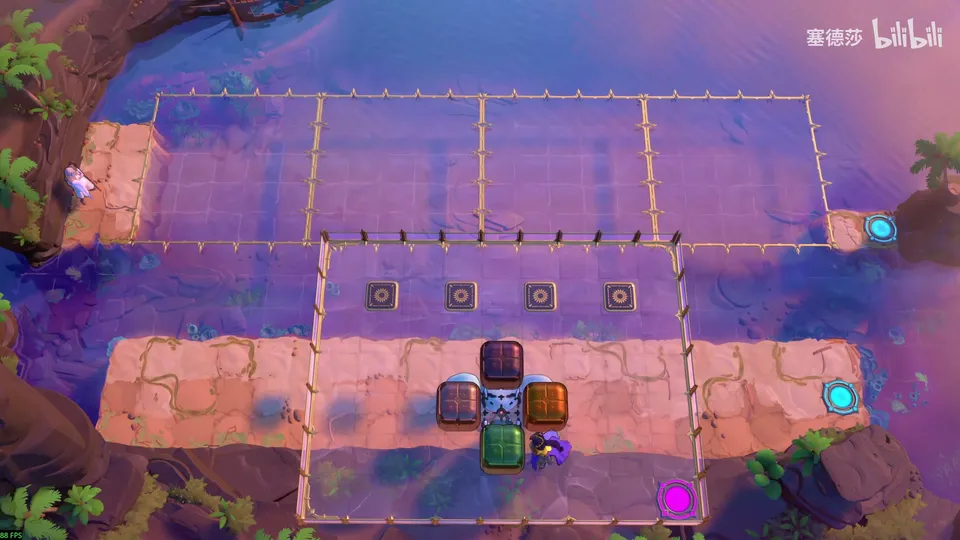
- Start from this piece. Joining these two costs two stones, that one three; the far-looking one costs just one. (21:18)
- The next join needs no stone at all. (22:22)
- The last: one stone to reach the goblin, and the goblin props the final stone. All three stones used. (22:33)
- Play: the Cleric body-blocks stones. At the far right, let the Cleric block the stone and cross by floating with the goblin (塞德莎 corrects himself here). (22:55)
Puzzle 25
Mirrors × Beams (EW)
Key idea: decide the order in which things fall down a two-deep pit. Five items stacked and pushed down split into a lower two and an upper three, so the order fixes what lands where. (塞德莎 P44 23:43)
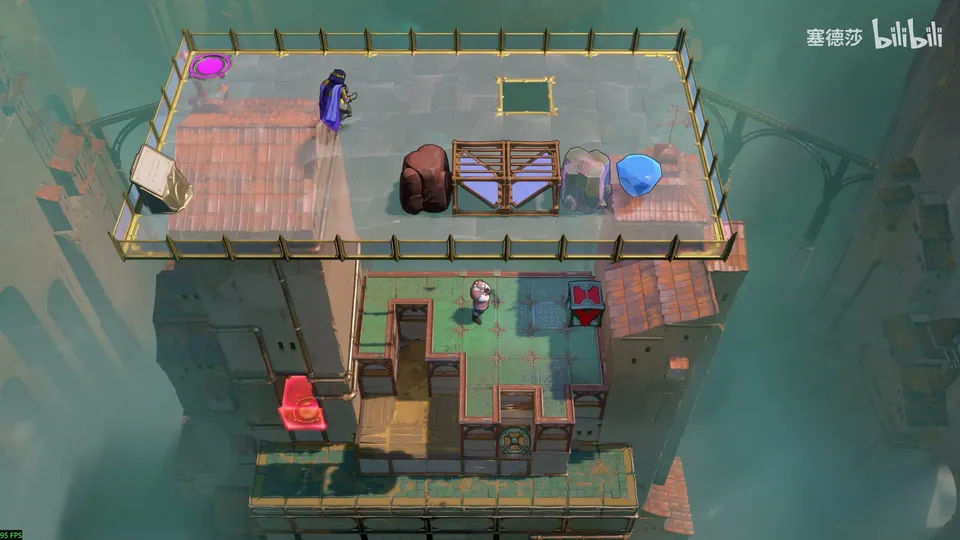
- Goal: the red beam has to reach the door next to the exit, using two mirrors. The red emitter is against the edge and can only be pushed down. (24:08)
- A crystal stone (it lets light through) props the mirror here, and the gem goes to its spot. A plain stone is spare. (24:44)
- Order from the bottom: crystal, mirror, gem, plain stone, mirror facing the other way. (26:32)
- Play: push the stack in, push the upper part on, push the mirror and the red emitter down, then push it left. (27:00)
Puzzle 26
Key idea: pick five of twelve mirrors. The purple beam’s end has to come straight up under the Explorer; the route goes through water mirrors and up and down through the floor (the Z axis). (塞德莎 P44 27:17)
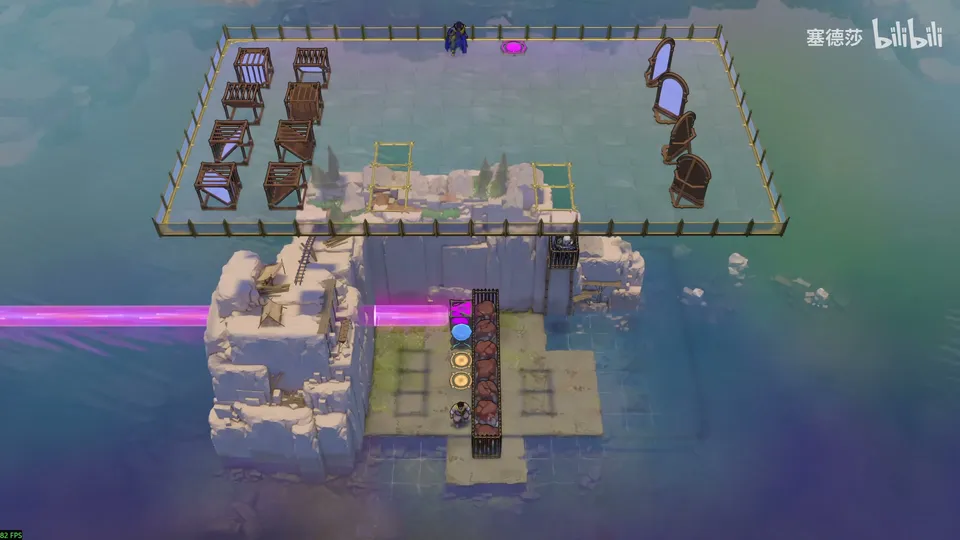
- Stacking two mirrors in the water fails: the Trader can’t push a stack, and nothing can follow afterwards. (27:57)
- So: a water mirror reflects it here, a mirror sends it down through the floor, then one up, then one more up under the Explorer. Five mirrors, five different directions. (28:50)
- Place them. (30:10)
- Play: push the left mirror into the water and stack the next on it (not further up yet), push the others in, then set the last one; the Explorer drops down. (30:45)
That finishes all the small rooms. Now the overworld puzzle on the big map. (31:27)
Overworld puzzle 2
Key idea: prepare the four corners of the big map, then cross it. Avoid the purple beam’s pull, keep the blue energy block from switching on, toggle the green button with a mirror and fill the hole. (塞德莎 P44 31:51)
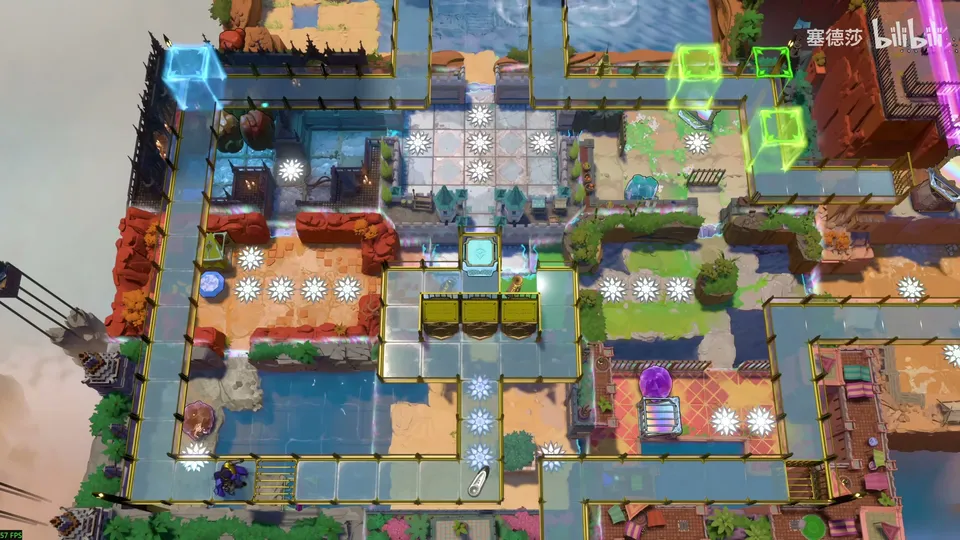
- NE: use the mirror at this angle to take the stone up, nudge the mirror left, press the button; the stone can now be toggled back and forth. (32:29)
- SE: push the mirror into the water, bring the stone down and round into the water to fill the hole. (32:59)
- SW: put a skipping stone at the purple beam’s end, so it won’t drag you off the bridge. (33:22)
- NW: break these stones, keep one and push it onto the blue button. (33:42)
- Send the lily pad with two crystals and a goblin into the current loop: push this stone up, then right. The EW machine needs nothing. (34:01)
- Cross: past the purple beam and the blue gate, over the goblins’ heads three times, a mirror, more timing, then mirror the stone up. (34:31)
Puzzle 27
The final room
Key idea: arrange the four world blocks so that everyone reaches the four exits in the centre. The only way in is the end of the purple beam, ending on the activated blue energy block, and the beam fires left, so the two mirrors on the right bend it in a U. (塞德莎 P44 35:26)
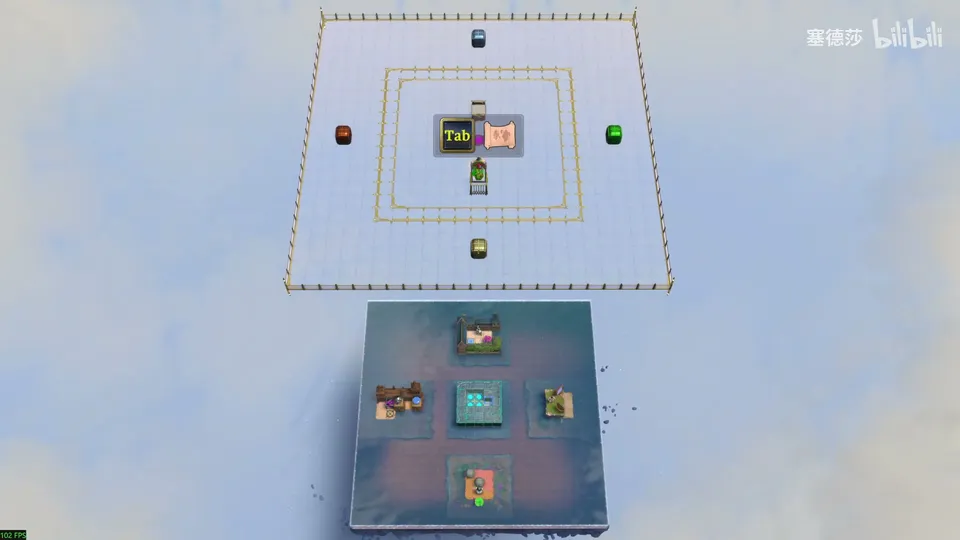
- Blocks must not overlap, not even under water. (35:36)
- The beam should fire right to left; the mirror island goes on the left half, one mirror facing the blue block and the other the beam. Shift it so nothing overlaps. (36:29)
- The Explorer needs the gem, and there is a hole in front of it: line up the spare skipping stone at the top-left with the hole. (37:26)
- The Thief must press a button but can only pull the stone out; the Sailor, riding the lily pad at the bottom-right, pushes it. Line the pad up with the gap in the Thief’s block. (37:35)
- To bring those two to the centre, the Trader pushes the upper mirror down so the beam first fires down; shift the block left so that beam reaches it. Exact position doesn’t matter. (38:13)
- Play: the Sailor pushes the stone up and the Explorer activates the gem; ride the pad down, the Thief pulls and the Sailor pushes; teleport the heroes over on the purple beam, then push the mirror down for the rest. (39:14)
Afterwards: you can’t go down by the stone because of a goblin, so go back the way you came; a shortcut is to reflect across and drop. At the bottom is the exit sign. (41:00)
Past it is the area after the second ending, with signs and recordings we don’t describe. If you didn’t push a certain stone earlier, a reset there lets you fix it before going round. (42:26) A cage there only opens after the third ending. (51:21)
Bonus hard rooms
Two optional rooms in the area after the ending. The sign says they are hard and give no reward; 塞德莎 counts them separately (697 puzzles for the first two stages without them, 699 with them). (P44 51:21)
Bonus puzzle 1
Key idea: the Thief can only pull, and he has to pull eight stones into the space on the right. It looks 5×5 but is cramped. Build a hook shape, then flip it to bring in the last stones. (塞德莎 P44 51:31)
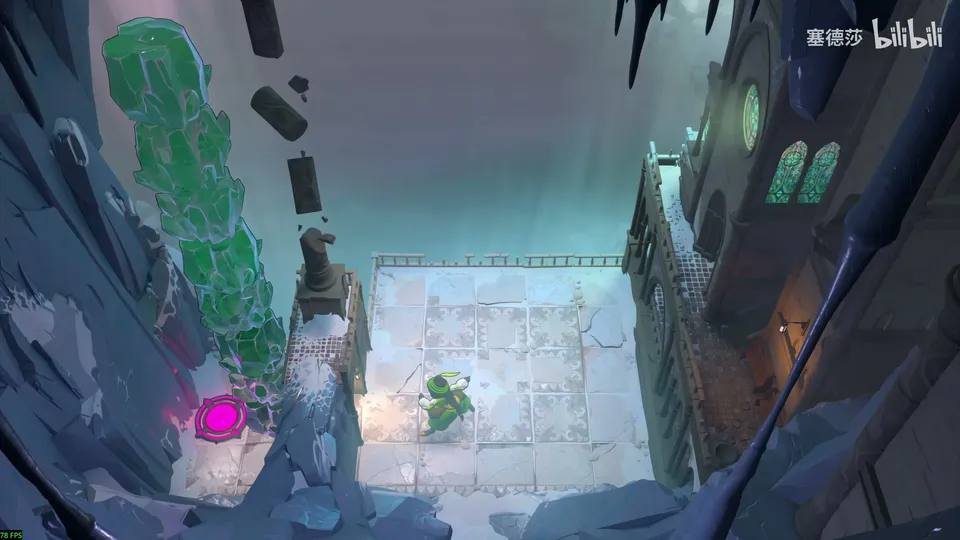
- The first four come freely. (52:01)
- Pull the next to the far right to form an upside-down L, then pull these stones down a little and bring the top one over: a hook. (52:11)
- Flip the hook: pull this stone here, right, this one down, the middle one right. Now the next stone can come in left and up. (52:42)
- Flip it back (down a little, over, up, left), then pull the last one in. (53:03)
This unlocks an elevator on the left, which is a shortcut back in; keep the doorway it uses clear. (53:25)
Bonus puzzle 2
Key idea: the hardest room in the game, by 塞德莎’s account. A lone Wizard and a ring of crystals, all on buttons except one button at the top-left. Moving a crystal there by swapping alone means building a mid-game structure through which the Wizard can move safely. (塞德莎 P44 53:37)
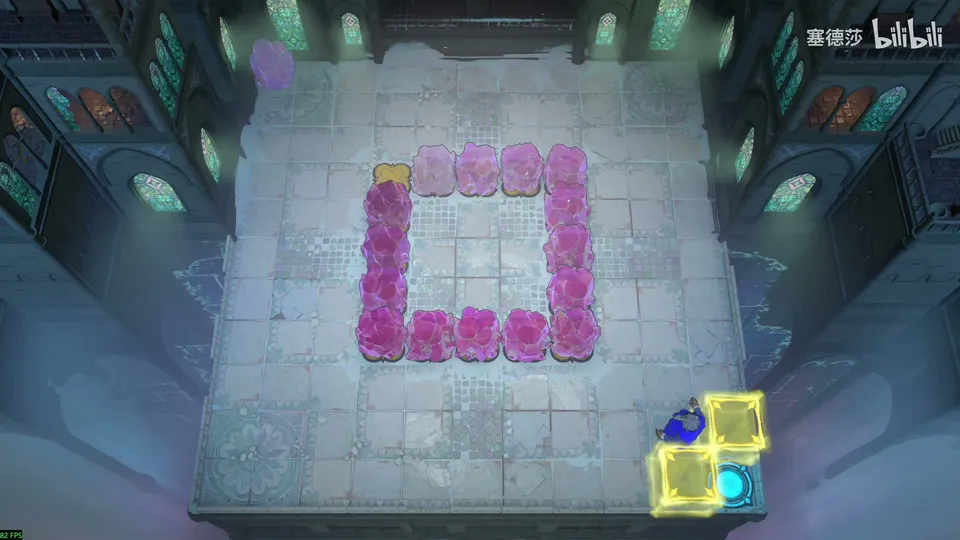
- Work backwards: at the end the Wizard stands where a crystal belongs and swaps out of it, so there must be a structure that allows that last swap. (54:26)
- The key is a shape with two missing crystals the Wizard can pass back and forth through; open one more gap and he can reach three spots safely. Add two more crystals to close a ring. (55:20)
- From that ring he can walk the through row, swap up and left into the centre, go down and left to the gap, swap up twice, and finish with a swap on the ring. (56:20)
- His plan for reaching it: break up the start freely, keep two crystals and a few tiles empty, bring the rest up through those gaps, then fill in the two upright ones using the two through rows. (59:17)
塞德莎’s 116-move solution (moves of the Wizard, taken down from his narration; each line links to where he reads it out):
- ← ← ↑ ← ← ← ↑ ← ↓ → → (1:00:32)
- ↓ ← ← ↓ ↓ → ↑ ↑ ↑ → ↓ ↓ ← (1:00:41)
- ↑ ↑ ↑ ↑ → ↓ (1:00:49)
- ← ↑ → → ↑ → ↓ ← ↓ → ↑ ↑ → ↓ ← ← ← ↑ ← ↓ → (1:00:52)
- ↑ ↑ ↑ ↑ → → ↓ → ↓ → ↑ ↑ ↑ ← ← ↓ → ↓ ↓ ↓ ← ↓ → ↓ ← ↑ ← (1:01:04)
- ← ← ← ← ↑ → ↓ ↓ ↓ ↓ ↓ ↓ → → ↓ ← — this is the mid-game structure from step 2 (1:01:17)
- ↑ → → → ↑ → ↓ → → ↑ ↑ ← ↓ ↓ ↓ → ↓ ↓ → → → → (1:01:36)
The seven lines add up to 116 moves, the count he gives. If a move doesn’t fit, check the line against the video. He mentions a 170-move solution posted by another uploader and a 101-move one from a comment, and thinks the optimum is under 100. (1:01:57)
That is everything in the second stage. 塞德莎 walks back to the main map, and a third stage follows; see how to descend. (1:02:36)